2018年4月26日 星期四

SQL 2014 Server HA failover solution without shared storage installation process

1. Base OS
2. Check MBR disk type D: disk
3. Add .NET Framework 3.5 and Failover features
4. Install SQS 2014, SP2, Balance Data Distributor
5. Enable Cluster Service
6. Check SQL/Cluster service works
7. Enable Always-on and 
8. Create new sql listener by creat Availability Group wizard (Bad)
9. Import and configure replica DB


No disk in it since we do not have SAN Share Storage


Final

2018年4月17日 星期二

CentOS 7 Installation, SSH Enablement, Proxy Setting


1. OS installation


2. Proxy Setting

在一般公司的環境下Client端都需要設定Proxy才可以對外連線
假設Proxy的IP:192.168.1.10 , port:8080
編輯 .bash_profile (root目錄下) ,新增以下(紅字):

http_proxy=192.168.1.10:8080
ftp_proxy=192.168.1.10:8080
export http_proxy
export ftp_proxy

執行
[root@Server ~]# source .bash_profile

看看是否設定成功
[root@Server ~]# echo $http_proxy
192.168.1.10:8080

  • 針對所有使用者
如果要讓這台主機的所有 http / https 都走 proxy 就設定在 /etc/profile

2.1 For Yum proxy setting
/etc/yum.conf
add line proxy=http://192.160.1.1:8080

$ vim /etc/apt/apt.conf
Acquire::http::Proxy "http://proxy.example.com";

2.2 Docker Hub Proxy setting [Refer]

mkdir /etc/systemd/system/docker.service.d
vim /etc/systemd/system/docker.service.d/http-proxy.conf

[Service]
Environment="HTTP_PROXY=http://10.1.107.222:8080"

systemctl daemon-reload
systemctl show --property Environment docker


設定永久變數
  • 僅在目前使用者
永久變數可以寫在登入後會讀取的 ~/.bash_profile , ~/.bashrc

  • 針對所有使用者
如果要讓這台主機的所有 http / https 都走 proxy 就設定在 /etc/profile

  • 僅 apt or yum 使用時才用 proxy


3. Yum install OpenSSH server
$ sudo yum install openssh openssh-server


4. Edit /etc/ssh/sshd_config

Port 22 -> xxx

PermitRootLogin no

Protocol 2


sudo systemctl restart sshd.service

sudo systemctl enable sshd.service

sudo systemctl status  sshd.service


5. Config Firewall

SELinux disable

Check Firewall already disabled
#getenforce

If Firewall not show disabled, please modify the file.
#vi /etc/sysconfig/selinux
SELINUX=disabled
(Need to reboot)

# firewall-cmd --permanent --add-port=200-300/tcp
success
# firewall-cmd --reload
successls


CentOS7 Firewall refer:
https://www.rootusers.com/how-to-open-a-port-in-centos-7-with-firewalld/
http://blog.xuite.net/tolarku/blog/363801991-CentOS+7+Firewalld+%E9%98%B2%E7%81%AB%E7%89%86%E8%AA%AA%E6%98%8E%E4%BB%8B%E7%B4%B9

6. Add new user

#Add user for DEV or QA

useradd John
passwd John

#chmod 660 /etc/sudoers
Add user into sudoer to get root permission
#vi /etc/sudoers
John ALL=(ALL)  ALL


2018年3月21日 星期三

Telnet testing port workable

Install telnet tool on Windows;


telnet www.example.net 80

NetBIOS Over TCP/IP
The Windows 2000 implementation of NetBIOS over TCP/IP is referred to as NetBT . NetBT uses the following TCP and UDP ports:

UDP port 137 (name services)

UDP port 138 (datagram services)

TCP port 139 (session services)

Execute Remote batch file

假設該電腦
虛擬IP 192.168.1.66
該資料夾為 D:\B_Folder
該檔案為 A.exe
步驟:
1.擁有該電腦的 Administrator 權限(單機最高權限)
帳號: administrator 密碼: pwd
2.寫批次檔內容如下(1.bat):
10.104.67.237
10.104.69.235


net use \\192.168.1.66\d$\B_Folder "pwd" /user:"admini"
\\192.168.1.66\d$\B_Folder\A.exe

Working:
net use \\hostname\D$\users\david "pwd" /user:"administrator"
\\hostname\D$\users\david\123.bat

Execute PowerShell Script

直接在 PowerShell 的環境中
打入 D:\Learning\PowerShell\Ch02\GetFileShares.ps1
或是
先 cd D:\Learning\PowerShell\Ch02\
再打入 .\GetFileShares.ps1 (即便是在現行作用目錄區中,也要用 .\ )

在啟動 PowerShell 環境時
PowerShell -Noexit -command "D:\Learning\PowerShell\Ch02\GetWmiAndQuery.ps1"
參數
-Noexit:為了保持 PowerShell 的執行結果,能保留下來。
-command:為了是在啟動 PowerShell 時,一併載入指定的批次檔案。


PowerShell Scripts 如何執行?

http://pertonchang.blogspot.tw/2009/05/powershell-scripts.html

Run as Administrator

Open Powershell first:
Type PowerShell to enter a PowerShell session.
Once in the session:
Type Start-Process PowerShell -Verb RunAs and press Enter.
That will open a new Powershell process as Administrator.
------- OR -------
To do it all with only one line from the command prompt, just type:
powershell -Command "Start-Process PowerShell -Verb RunAs"

Curl and Invoke-WebRequest

Linux Bash:
Wroking: ***
curl -u "Account:PWD or API Token" 'http://FQDN:8080/crumbIssuer/api/xml?xpath=concat(//crumbRequestField,":",//crumb)'

Return:
Jenkins-Crumb:***************************

curl -X POST -u "Account:PWD or API Token" -H "Jenkins-Crumb:***************************" http://FQDN:8080/view/Operation/view/2_Stage/job/****/buildWithParameters?token=****&cause=trigger+by+shavlik+POC


PowerShell:

Start-Sleep -s 180
$JenkinsURL = "http://FQDN:8080"
$JobName = "view/Operation/view/2_Stage/job/****"
$JobToken = "****************t"
$Auth = "Account:PWD or API Token"
$Bytes = [System.Text.Encoding]::UTF8.GetBytes($Auth)
$Base64bytes = [System.Convert]::ToBase64String($Bytes)
$Headers = @{ "Authorization" = "Basic $Base64bytes"}
$CrumbIssuer = "$JenkinsURL/crumbIssuer/api/xml?xpath=concat(//crumbRequestField,`":`",//crumb)"
$Crumb = Invoke-WebRequest -UseBasicParsing $CrumbIssuer -Headers $Headers
Write-Host $Crumb

$Regex = '^Jenkins-Crumb:([A-Z0-9]*)'
$Matches = @([regex]::matches($crumb, $regex, 'IgnoreCase'))
$RegCrumb = $Matches.Groups[1].Value
$Headers.Add("Jenkins-Crumb", "$RegCrumb")
Write-Host $Headers

$FullURL = "$JenkinsURL/$JobName/buildWithParameters?token=$JobToken"
Write-Host $FullURL
Invoke-WebRequest -UseBasicParsing $FullURL -Method POST -Headers $Headers

<End>

Refer:
Enable the URL job trigger:
https://www.nczonline.net/blog/2015/10/triggering-jenkins-builds-by-url/

CSRF Protection Explained
https://support.cloudbees.com/hc/en-us/articles/219257077-CSRF-Protection-Explained

Trigger Jenkins Builds Using PowerShell
https://www.smartfile.com/blog/trigger-jenkins-builds-using-powershell/

PowerShell Command
https://docs.microsoft.com/en-us/powershell/module/microsoft.powershell.utility/start-sleep?view=powershell-6


2018年3月19日 星期一

Connecting to a remote server through a VPN when the local network subnet address conflicts with a remote network


https://serverfault.com/questions/548888/connecting-to-a-remote-server-through-a-vpn-when-the-local-network-subnet-addres/835400#835400


added my desired destination server (192.168.1.100) to my routing table on my linux client via:
route add 192.168.1.100 dev tun0


route add -host 10.1.101.145 -interface [vpn interface name]

Windows cmd
route print

使用中的路由:
網路目的地                 網路遮罩         閘道          介面       計量
          0.0.0.0          0.0.0.0     10.1.187.254      10.1.184.23     10
       10.1.184.0    255.255.252.0            在連結上       10.1.184.23    266
      10.1.184.23  255.255.255.255            在連結上       10.1.184.23    266
:::

route add 192.168.99.0 mask 255.255.255.0 192.168.1.1


http://ctwivan.blogspot.tw/2010/08/windowsstatic-route.html
http://blog.xuite.net/ganpin917/home/49852565-%E9%9B%BB%E8%85%A6%E5%8F%8AServer+%E6%89%8B%E5%8B%95%E5%A2%9E%E5%8A%A0%E8%B7%AF%E7%94%B1


How-To: Route Print (Mac OS X)

https://www.unh.edu/it/kb/article/how-to-route-print-mac-os-x.html
netstat -nr

2018年3月8日 星期四

Configure apt-get behind proxy server for Ubuntu 14/15/16


$ lsb_release -a
No LSB modules are available.
Distributor ID: Ubuntu
Description:    Ubuntu 16.04 LTS
Release:        16.04
Codename:       xenial


$ sudo vi /etc/apt/apt.conf

Acquire::http::Proxy "http://proxy_host:port";


To make this command permanent add it to ~/.bash.rc in your home directory:

vi ~/.bash.rc


Now Check and restart the updates:

root@ubuntu:~# apt-get  update
Hit:1 http://security.ubuntu.com/ubuntu xenial-security InRelease
Get:2 http://us.archive.ubuntu.com/ubuntu xenial InRelease [95.8 kB]
:::
Okay


To use wget behind proxy

sudo vi /etc/wgetrc

https_proxy  = http://username:password@proxy:port
http_proxy = http://username:password@proxy:port
http_proxy = http://Domain\username:password@proxy:port # (in case of LDAP)
ftp_proxy = http://username:password@proxy:port
Uncomment 'use_proxy = on'


Now  try to use  wget

root@ubuntu:~# wget http://repo.zabbix.com/zabbix/2.4/ubuntu/pool/main/z/zabbix-release/zabbix-release_2.4-1+trusty_all.deb
--2016-03-03 06:05:26--  http://repo.zabbix.com/zabbix/2.4/ubuntu/pool/main/z/zabbix-release/zabbix-release_2.4-1+trusty_all.deb
Connecting to 10.133.80.35:8080... connected.
Proxy request sent, awaiting response... 200 OK
Length: 2674 (2.6K) [application/x-debian-package]
Saving to: ‘zabbix-release_2.4-1+trusty_all.deb’

Okay

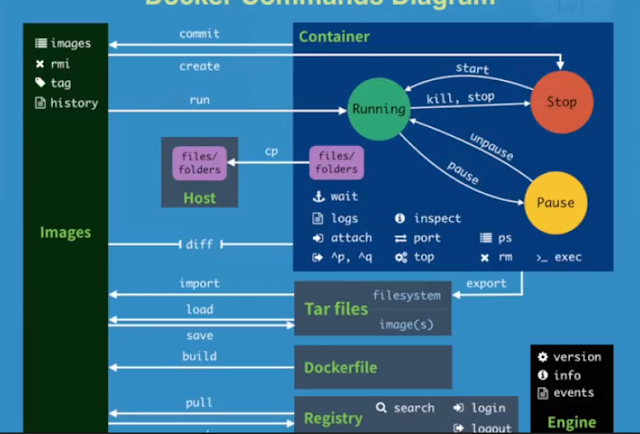
Docker Command

#1 pull images $docker pull chusiang/takaojs1607 #2 list images $docker images #3.1 run docker $docker run -it ### bash #3.2 run do...