顯示具有 Windows 標籤的文章。 顯示所有文章

2021年12月6日 星期一

將資料夾底下的全部檔案列表出來,並儲存成檔案

Command

dir /b /s *.* > file_list.xls

dir /b /s *.* > file_list.txt

Save as bat file -> Double click to execute. 方便


2021年4月29日 星期四

2018年3月21日 星期三

Execute Remote batch file

假設該電腦
虛擬IP 192.168.1.66
該資料夾為 D:\B_Folder
該檔案為 A.exe
步驟:
1.擁有該電腦的 Administrator 權限(單機最高權限)
帳號: administrator 密碼: pwd
2.寫批次檔內容如下(1.bat):
10.104.67.237
10.104.69.235


net use \\192.168.1.66\d$\B_Folder "pwd" /user:"admini"
\\192.168.1.66\d$\B_Folder\A.exe

Working:
net use \\hostname\D$\users\david "pwd" /user:"administrator"
\\hostname\D$\users\david\123.bat

Execute PowerShell Script

直接在 PowerShell 的環境中
打入 D:\Learning\PowerShell\Ch02\GetFileShares.ps1
或是
先 cd D:\Learning\PowerShell\Ch02\
再打入 .\GetFileShares.ps1 (即便是在現行作用目錄區中,也要用 .\ )

在啟動 PowerShell 環境時
PowerShell -Noexit -command "D:\Learning\PowerShell\Ch02\GetWmiAndQuery.ps1"
參數
-Noexit:為了保持 PowerShell 的執行結果,能保留下來。
-command:為了是在啟動 PowerShell 時,一併載入指定的批次檔案。


PowerShell Scripts 如何執行?

http://pertonchang.blogspot.tw/2009/05/powershell-scripts.html

Run as Administrator

Open Powershell first:
Type PowerShell to enter a PowerShell session.
Once in the session:
Type Start-Process PowerShell -Verb RunAs and press Enter.
That will open a new Powershell process as Administrator.
------- OR -------
To do it all with only one line from the command prompt, just type:
powershell -Command "Start-Process PowerShell -Verb RunAs"

Curl and Invoke-WebRequest

Linux Bash:
Wroking: ***
curl -u "Account:PWD or API Token" 'http://FQDN:8080/crumbIssuer/api/xml?xpath=concat(//crumbRequestField,":",//crumb)'

Return:
Jenkins-Crumb:***************************

curl -X POST -u "Account:PWD or API Token" -H "Jenkins-Crumb:***************************" http://FQDN:8080/view/Operation/view/2_Stage/job/****/buildWithParameters?token=****&cause=trigger+by+shavlik+POC


PowerShell:

Start-Sleep -s 180
$JenkinsURL = "http://FQDN:8080"
$JobName = "view/Operation/view/2_Stage/job/****"
$JobToken = "****************t"
$Auth = "Account:PWD or API Token"
$Bytes = [System.Text.Encoding]::UTF8.GetBytes($Auth)
$Base64bytes = [System.Convert]::ToBase64String($Bytes)
$Headers = @{ "Authorization" = "Basic $Base64bytes"}
$CrumbIssuer = "$JenkinsURL/crumbIssuer/api/xml?xpath=concat(//crumbRequestField,`":`",//crumb)"
$Crumb = Invoke-WebRequest -UseBasicParsing $CrumbIssuer -Headers $Headers
Write-Host $Crumb

$Regex = '^Jenkins-Crumb:([A-Z0-9]*)'
$Matches = @([regex]::matches($crumb, $regex, 'IgnoreCase'))
$RegCrumb = $Matches.Groups[1].Value
$Headers.Add("Jenkins-Crumb", "$RegCrumb")
Write-Host $Headers

$FullURL = "$JenkinsURL/$JobName/buildWithParameters?token=$JobToken"
Write-Host $FullURL
Invoke-WebRequest -UseBasicParsing $FullURL -Method POST -Headers $Headers

<End>

Refer:
Enable the URL job trigger:
https://www.nczonline.net/blog/2015/10/triggering-jenkins-builds-by-url/

CSRF Protection Explained
https://support.cloudbees.com/hc/en-us/articles/219257077-CSRF-Protection-Explained

Trigger Jenkins Builds Using PowerShell
https://www.smartfile.com/blog/trigger-jenkins-builds-using-powershell/

PowerShell Command
https://docs.microsoft.com/en-us/powershell/module/microsoft.powershell.utility/start-sleep?view=powershell-6

2017年12月21日 星期四

How to flush DNS cache in Linux / Windows / Mac

Flush dns to get a new name resolution. Also flush dns cache when you can’t access a newly registered domain name. You can simply flush your dns cache anytime to get new entry. So, Flush your dns cache now.

To flush DNS cache in Microsoft Windows (Win XP, Win ME, Win 2000):
– Start -> Run -> type cmd
 – in command prompt, type ipconfig /flushdns
 – Done! You Window DNS cache has just been flush.

To flush the DNS cache in Linux, restart the nscd daemon:
 – To restart the nscd daemon, type /etc/rc.d/init.d/nscd restart in your terminal
 – Once you run the command your linux DNS cache will flush.

To flush the DNS cache in Mac OS X Leopard:
– type lookupd -flushcache in your terminal to flush the DNS resolver cache.
 ex: bash-2.05a$ lookupd -flushcache
 – Once you run the command your DNS cache (in Mac OS X) will flush.

To flush the DNS cache in Mac OS X:-

– type dscacheutil -flushcache in your terminal to flush the DNS resolver cache.
 ex: bash-2.05a$ dscacheutil -flushcache
 – Once you run the command your DNS cache (in Mac OS X Leopard) will flush.


2017年11月14日 星期二

Windows Telnet Client


Could not execute Telnet


Install Tenlet Client by run as Adminstrator
dism /online /Enable-Feature /FeatureName:TelnetClient


tlntadmn [\\server] config port=PortNumber

tlntadmn [\\localhost] config port=139


tlntadmn config port=139


Check open TCP/IP port in Windows
netstat -an


2017年10月18日 星期三

利用微軟作業系統內建指令XCOPY+Task Scheduler代替備份軟體

微軟作業系統內建指令XCOPY備份功能介紹
您是否曾遇到硬碟或隨身碟故障,導致檔案損壞的情況,此時才後悔沒備份。但備份工作既耗時又常碰到問題,有時備份到一半出現錯誤訊息,到底備份多少也不知道,還要重來!因此,介紹一個具有以下特色的備份方法。
不需購買或安裝軟體
可完全備份或只備份日期較新的檔案
備份的檔案如損壞可以跳過繼續備份其它檔案
可利用系統排程做定時備份
設計原理
建立一個批次執行檔(bat),裡面放一行Windows所提供的XCOPY指令,再加入適當的參數就可以輕鬆完成備份工作。
操作流程
1.執行記事本:點選[程式集]/[附屬應用程式]/[記事本]

2.輸入以下指令(可用複製/貼上功能再自行修改內容)
XCOPY . D:\隨身碟備份\ /D/K/E/Y/C/I/H (不要加H, 很麻煩)

來源:點號 . ,表示複製此批次執行檔所存放位置的所有檔案。
目的:D:\隨身碟備份\,表示複製到目的地為D碟的[隨身碟備份]資料夾內。
參數:/D/K/E/Y/C/I/H,/D只複製比目的檔還新的檔案,/K複製後檔案屬性不變,/E包含子目錄,/Y不要求確認,/C錯誤發生也繼續,/I目的不存在就建立資料夾,/H複製隱藏檔和系統檔。

3.將檔案存在您要備份的磁碟機或資料夾內(一定要切換存檔類型為所有檔案,且副檔名一定要輸入.bat)。


4.用檔案總管點兩下執行設計完成的批次檔(bat檔),開始進行備份工作。


5.往後要做備份,只要點兩下此批次檔即可,且備份速度比第一次快很多哦!(因為它只拷貝比目的檔還新的檔案)

6. 可用工作排程器加入固定排程

Windows XP排程設計
  以上提供的是半自動的備份方法,如果要完成全自動定時做備份的工作可以利用Windows內建的[排定的工作],定時執行我們所建立的批次執行檔(bat),完成定時備份的功能。操作流程如下:
操作流程
1.開啟[程式集]/[附屬應用程式]/[系統工具]/[排定的工作]。
2.點選[下一步] 。
3.按[瀏覽]挑選我們設計好要備份用的批次檔。
4.挑選工作執行的方式,例如:每日、每週、每月。
5.輸入開始時間。
6.輸入此電腦開機時所使用的帳號及密碼。
7.完成。

Example: 2022/05/23 and works
XCOPY D:\Backup\ERP-Backup\ERP*.* F:\ /D/K/E/Y/C/I
forfiles -p "F:" -s -m ERP*.* -d -14 -c "cmd /c del @PATH"

XCOPY指令詳解
XCOPY source [destination] [/A | /M] [/D[:date]] [/P] ..........

source       指定要複製的檔案。
destination  指定位置或者/以及新檔案的名稱。
/A    只複製設定成保存屬性的檔案,不要改變屬性的設定。
/M    只複製設定成保存屬性的檔案,並清除保存屬性。
/D:m-d-y  複製指定日期當天或之後變更的檔案。如果沒給日期,只複製那些來源檔案日期比目的檔案日期為新的檔案。
/EXCLUDE:file1[+file2][+file3]...
        指定檔案清單字串。每個字串應在不同行。如果有字串對應到要進行複製的檔案絕
        對路徑的任何部分,這個檔案會被排除複製。例如,指定字串
        \obj\ 或 .obj 的話,會排除所有在 obj 目錄下副檔名是.obj 的檔案複製。
/P    在建立每個目的檔案時顯示提示。
/S    複製每個目錄及其包含的子目錄,不複製空目錄。
/E    複製每個目錄及其包含的子目錄,也複製空目錄。/S 與 /E相同,能夠用來修改 /T。
/V    驗證每個新檔案。
/W    在複製之前提示您按鍵繼續。
/C    如果錯誤發生時也繼續複製。
/I    如果目的不存在且複製一個以上的檔案的話,就假設指定的目的一定是目錄。
/Q    在複製時不要顯示檔名。
/F    在複製時顯示來源及目的檔案的全部檔名。
/L    顯示要複製的檔案。
/G    允許加密檔案複製到不支援加密的目的地。
/H    複製隱藏檔和系統檔。
/R    覆蓋唯讀檔案。
/T    建立目錄結構,但不複製其中的檔案。不包括空目錄及子目錄。
      /T /E 會包括空目錄及子目錄。
/U    只複製已經存在目的位置的檔案。
/K    複製檔案屬性。通常 Xcopy 會重設唯讀的屬性。
/N    用所產生的短檔名來進行複製。
/O    複製檔案所有權及 ACL 資訊。
/X    複製檔案審查設定 (包含 /O)。
/Y    不要提示您確認是否要覆蓋一個已經存在的檔案。
/-Y    示您確認是否要覆蓋一個已經存在的檔案。
/Z    在可重新開始的模式中複製網路檔案。

2017年10月2日 星期一

如何利用「磁碟清理」工具 安全的騰出系統硬碟的多餘空間

磁碟清理 Server 磁碟空間不足 DISM


Server 磁碟空間不足時可用指令

CMD (run as administrator)

Windows Server 2008 以下

dism /online /cleanup-image /spsuperseded /hidesp

Windows 2012 以上

DISM.exe /online /Cleanup-Image /StartComponentCleanup


參照:http://blog.miniasp.com/post/2014/01/22/Using-Disk-Cleanup-Wizard-delete-outdated-Windows-Update-files.aspx


WIN2012 R2 磁碟清理
如果在WIN2012 R2 要啟用磁碟清理的功能,需要安裝"桌面體驗",才會有磁碟清理的功能。
安裝路徑如圖示


匯出Windows server 有安裝的patch wmic gfe get

wmic qfe get > hotfix.txt

Fix Windows Update Error Code 84B20002

Refer http://windows.update.error.code.84b20002.errorfix012.com/

PROBLEM: This error is usually caused by misconfigured system files that create registry errors within your operating system. Windows errors can cause program lock-ups, slow PC performance, system crashes, computer freezing and more.
CAUSE: Registry errors generally occur when new programs are installed over old ones without the old programs being completely uninstalled. This can cause registry pile-ups and error messages. Another potential cause of these error messages can come from malicious software such as adware, spyware, and viruses.
SOLUTIONS: Scan and repair any missing or damaged Windows registry files using RegCure Pro. After the registry issues are resolved, it is recommended to optimize your PC by removing any spyware, adware and viruses with Plumbytes.

STEP 1Automatically Fix with RegCure Pro

STEP 2Optimize your PC with Plumbytes.

如何處理由大型 Windows 元件存放區 (WinSxS) 目錄所引起的磁碟空間問題

徵狀
當您檢視 C:\Windows 資料夾的大小時,可能會注意到 C:\Windows\winsxs 目錄似乎用到大量的磁碟空間。


發生的原因
Windows 安裝的服務作業期間,會使用到 Windows 元件存放區 (C:\Windows\winsxs) 目錄。服務作業包括 (但不限於) Windows Update、Service Pack 和 Hotfix 安裝。 

元件存放區包含 Windows 安裝所需的所有檔案。此外,在安裝更新時,這些檔案的任何更新也都存放在元件存放區中。因此,隨著安裝新增越來越多的更新、功能或角色,元件存放區也隨著時間成長。元件存放區在其本身和其他 Windows 目錄之間使用 NTFS 永久連結,以增加 Windows 平台的穩定性。

元件存放區會顯示出目錄大小很大,是因為 Windows 檔案總管殼層也計算永久連結。Windows 殼層會在該檔案所在之每個目錄中,將每個永久連結的參考計算為檔案的單一執行個體。例如,如果名為 advapi32.dll 的檔案是 700 KB 且位在元件存放區以及 \Windows\system32 目錄中,Windows 檔案總管會不準確地報告該檔案佔用 1,400 KB 的硬碟空間。

解決方案
由於 NTFS 永久連結的關係,元件存放區不能位在系統磁碟區以外的磁碟區上。如果您嘗試移動元件存放區,將會造成無法正確安裝 Windows 更新、Service Pack、角色或功能。此外,也不建議您以手動方式移除或刪除元件存放區中的檔案


若想降低 Windows 安裝上的元件存放區目錄大小,您可以決定永久安裝 Service Pack 並回收 Service Pack 檔案用過的空間。不過,如果您將 Service Pack 永久安裝的話,以後將無法移除該 Service Pack。

若要從 Windows 安裝移除 Service Pack 檔案,請使用下列內建公用程式:

已安裝 Windows Vista Service Pack 1:VSP1CLN.EXE
已安裝 Windows Vista Service Pack 2 或 Windows Server 2008 Service Pack 2:Compcln.exe
已安裝 Windows 7 Service Pack 1 或 Windows Server 2008 R2 Service Pack 1:
DISM /online /Cleanup-Image /SpSuperseded 
或磁碟清除精靈 (cleanmgr.exe)

也可以在系統上強制移除事件,以主動執行 Windows Vista 和 Windows Server 2008 上的清除作業。清除作業會嘗試從安裝中移除不要的系統二進位檔案,並啟用 Windows 回收磁碟空間。若想在 Windows 安裝上發出解除安裝事件,請新增並移除尚未安裝的不要的系統元件,然後重新啟動 Windows 安裝。清除會在下次重新啟動作業系統期間執行。


注意 Windows 7 和 Windows Server 2008 R2 安裝會自動執行清除。

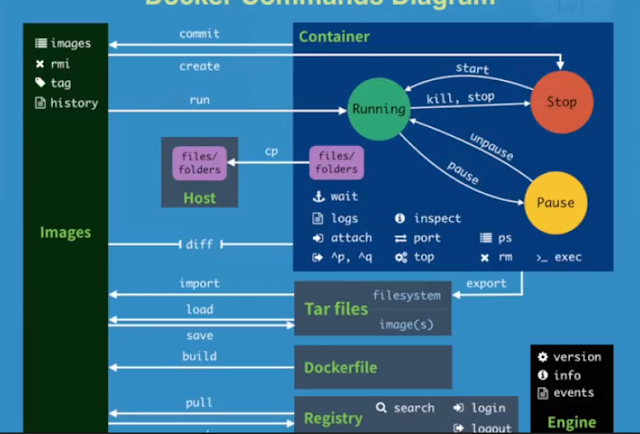
Docker Command

#1 pull images $docker pull chusiang/takaojs1607 #2 list images $docker images #3.1 run docker $docker run -it ### bash #3.2 run do...