顯示具有 Command 標籤的文章。 顯示所有文章

2022年5月27日 星期五

check_systemv1.1

 check_systemv1.1.bat 可用於電腦資產盤點

@echo off

REM 後續命令使用的是:UTF-8編碼

chcp 65001

echo ***Thanks for your cooperation***

echo ***感謝你的合作***

timeout 1

echo ****Windows 10 system will be complete soon.****

echo ****Windows 10電腦很快就完成,約30 secs內.****

timeout 2

echo *****Windows 7 system will take 2-3 mins.*****

echo *****Windows 7 電腦稍等2-3分鐘,你可以放著此視窗跑,先做其他工作.*****

timeout 3

echo %time%

ver > %computername%_sys.txt

echo %time%

hostname >> %computername%_sys.txt

echo %time%

ipconfig /all >> %computername%_ifconfig.txt

echo %time%

wmic product get name,version > %computername%_sw.txt

echo %time%

echo ****Wait for a while****

systeminfo > %computername%_systeminfo.txt

echo %time%

echo ******Completed. Thank you very much. *******

echo ******完成了~~~!再次感謝你. *******

echo ******別忘了把文字檔拷貝-貼到到公用區 *******

timeout 10

2021年12月6日 星期一

將資料夾底下的全部檔案列表出來,並儲存成檔案

Command

dir /b /s *.* > file_list.xls

dir /b /s *.* > file_list.txt

Save as bat file -> Double click to execute. 方便


2019年11月14日 星期四

Linux command egrep

max@ubuntu:~$ ifconfig |egrep "HWadd|inet"
ens32     Link encap:Ethernet  HWaddr 00:0c:29:b8:26:8e
          inet addr:192.168.88.45  Bcast:192.168.88.255  Mask:255.255.255.0
          inet6 addr: fe80::20c:29ff:feb8:268e/64 Scope:Link
          inet addr:127.0.0.1  Mask:255.0.0.0
          inet6 addr: ::1/128 Scope:Host

max@ubuntu:~$ route |egrep "Dest|168.88"
Destination     Gateway         Genmask         Flags Metric Ref    Use Iface
default         192.168.88.1    0.0.0.0         UG    0      0        0 ens32
192.168.88.0    *               255.255.255.0   U     0      0        0 ens32

2018年9月16日 星期日

Windows Battery report Command

powercfg /batteryreport /output "C:\battery_report.html"
開 command line 貼上這行指令,就會輸出到 C:\battery_report.html


2017年12月21日 星期四

How to flush DNS cache in Linux / Windows / Mac

Flush dns to get a new name resolution. Also flush dns cache when you can’t access a newly registered domain name. You can simply flush your dns cache anytime to get new entry. So, Flush your dns cache now.

To flush DNS cache in Microsoft Windows (Win XP, Win ME, Win 2000):
– Start -> Run -> type cmd
 – in command prompt, type ipconfig /flushdns
 – Done! You Window DNS cache has just been flush.

To flush the DNS cache in Linux, restart the nscd daemon:
 – To restart the nscd daemon, type /etc/rc.d/init.d/nscd restart in your terminal
 – Once you run the command your linux DNS cache will flush.

To flush the DNS cache in Mac OS X Leopard:
– type lookupd -flushcache in your terminal to flush the DNS resolver cache.
 ex: bash-2.05a$ lookupd -flushcache
 – Once you run the command your DNS cache (in Mac OS X) will flush.

To flush the DNS cache in Mac OS X:-

– type dscacheutil -flushcache in your terminal to flush the DNS resolver cache.
 ex: bash-2.05a$ dscacheutil -flushcache
 – Once you run the command your DNS cache (in Mac OS X Leopard) will flush.


2017年12月10日 星期日

HDFS Commands

ubuntu@nn:~$ . /opt/hadoop-2.8.2/sbin/start-dfs.sh
Illegal option -b
-bash: cd: Usage: /usr/bin: No such file or directory?
Starting namenodes on [nn]
nn: starting namenode, logging to /tmp/hadoop-ubuntu-namenode-nn.out
dn02: starting datanode, logging to /tmp/hadoop-ubuntu-datanode-dn02.out
dn01: starting datanode, logging to /tmp/hadoop-ubuntu-datanode-dn01.out
Starting secondary namenodes [0.0.0.0]
0.0.0.0: starting secondarynamenode, logging to /tmp/hadoop-ubuntu-secondarynamenode-nn.out

List
ubuntu@nn:~$ hdfs dfs -ls /

Create Folder
ubuntu@nn:~$ hdfs dfs -mkdir /Big 建立hdfs目錄
ubuntu@nn:~$ hdfs dfs -ls /
Found 1 items
drwxr-xr-x   - ubuntu supergroup          0 2017-12-08 10:34 /Big

Copy file from local
ubuntu@nn:~$ hdfs dfs -copyFromLocal .bash* 

List
ubuntu@nn:~$ hdfs dfs -ls /Big
Found 3 items
-rw-r--r--   2 ubuntu supergroup      10427 2017-12-08 10:37 /Big/.bash_history
-rw-r--r--   2 ubuntu supergroup        220 2017-12-08 10:37 /Big/.bash_logout
-rw-r--r--   2 ubuntu supergroup       3986 2017-12-08 10:37 /Big/.bashrc

ubuntu@nn:~$ hdfs dfsadmin -printTopology 檢查datanode
Rack: /default-rack
   172.16.1.210:50010 (dn01)
   172.16.1.211:50010 (dn02)

檢視 HDFS 根目錄權限設定
ubuntu@nn:~$ hdfs dfs -getfacl /
# file: /
# owner: ubuntu
# group: supergroup
user::rwx
group::r-x
other::r-x

顯示檔案內容
ubuntu@nn:~$ hdfs dfs -cat /Big/.bashrc | head -n 5
# ~/.bashrc: executed by bash(1) for non-login shells.
# see /usr/share/doc/bash/examples/startup-files (in the package bash-doc)
# for examples

# If not running interactively, don't do anything


取回檔案, copy file from hdfs to local file system
ubuntu@nn:~$ hdfs dfs -get /Big/.bashrc /tmp/test.txt

Delet file
ubuntu@nn:~$ hdfs dfs -rm /Big/.bashrc
Deleted /Big/.bashrc


Delete directory
ubuntu@nn:~$ hdfs dfs -rm -r /Big
Deleted /Big


ubuntu@nn:~$ hdfs dfsadmin -report
Configured Capacity: 51908788224 (48.34 GB)
Present Capacity: 31196621972 (29.05 GB)
DFS Remaining: 31196504064 (29.05 GB)
DFS Used: 117908 (115.14 KB)
DFS Used%: 0.00%
Under replicated blocks: 0
Blocks with corrupt replicas: 0
Missing blocks: 0
Missing blocks (with replication factor 1): 0
Pending deletion blocks: 0

-------------------------------------------------
Live datanodes (2):

Name: 172.16.1.210:50010 (dn01)
Hostname: dn01
Decommission Status : Normal
Configured Capacity: 25954394112 (24.17 GB)
DFS Used: 58954 (57.57 KB)
Non DFS Used: 10339305910 (9.63 GB)
DFS Remaining: 15598252032 (14.53 GB)
DFS Used%: 0.00%
DFS Remaining%: 60.10%
Configured Cache Capacity: 0 (0 B)
Cache Used: 0 (0 B)
Cache Remaining: 0 (0 B)
Cache Used%: 100.00%
Cache Remaining%: 0.00%
Xceivers: 1
Last contact: Mon Dec 11 03:15:08 UTC 2017


Name: 172.16.1.211:50010 (dn02)
Hostname: dn02
Decommission Status : Normal
Configured Capacity: 25954394112 (24.17 GB)
DFS Used: 58954 (57.57 KB)
Non DFS Used: 10339305910 (9.63 GB)
DFS Remaining: 15598252032 (14.53 GB)
DFS Used%: 0.00%
DFS Remaining%: 60.10%
Configured Cache Capacity: 0 (0 B)
Cache Used: 0 (0 B)
Cache Remaining: 0 (0 B)
Cache Used%: 100.00%
Cache Remaining%: 0.00%
Xceivers: 1
Last contact: Mon Dec 11 03:15:07 UTC 2017

檢查HDFS 檔案儲存資訊
ubuntu@nn:~$ hdfs fsck /test/.bashrc -files -blocks -locations
Connecting to namenode via http://nn:50070/fsck?ugi=ubuntu&files=1&blocks=1&locations=1&path=%2Ftest%2F.bashrc
FSCK started by ubuntu (auth:SIMPLE) from /172.16.1.200 for path /test/.bashrc at Mon Dec 11 03:19:32 UTC 2017
/test/.bashrc 3986 bytes, 1 block(s):  OK
0. BP-1002866620-172.16.1.200-1512720036248:blk_1073741830_1006 len=3986 Live_repl=2 [DatanodeInfoWithStorage[172.16.1.210:50010,DS-d8538572-f70d-49ab-b15e-032b1a2fb7d3,DISK], DatanodeInfoWithStorage[172.16.1.211:50010,DS-eeff478f-03b8-4958-97ef-6e1c8a30d42b,DISK]]

Status: HEALTHY
 Total size:    3986 B
 Total dirs:    0
 Total files:   1
 Total symlinks:                0
 Total blocks (validated):      1 (avg. block size 3986 B)
 Minimally replicated blocks:   1 (100.0 %)
 Over-replicated blocks:        0 (0.0 %)
 Under-replicated blocks:       0 (0.0 %)
 Mis-replicated blocks:         0 (0.0 %)
 Default replication factor:    2
 Average block replication:     2.0
 Corrupt blocks:                0
 Missing replicas:              0 (0.0 %)
 Number of data-nodes:          2
 Number of racks:               1
FSCK ended at Mon Dec 11 03:19:32 UTC 2017 in 2 milliseconds

The filesystem under path '/test/.bashrc' is HEALTHY


About Secondary NameNode: fsimage andd edits file
 
Check Secondary NameNode 預設的儲存目錄
Default /tmp, reboot 會清空
ubuntu@nn:~$ tree /tmp/hadoop-ubuntu/dfs/namesecondary/
/tmp/hadoop-ubuntu/dfs/namesecondary/
├── current
│   ├── edits_0000000000000000001-0000000000000000002
│   ├── edits_0000000000000000004-0000000000000000006
│   ├── edits_0000000000000000007-0000000000000000026
│   ├── edits_0000000000000000027-0000000000000000028
│   ├── edits_0000000000000000029-0000000000000000030
│   ├── edits_0000000000000000031-0000000000000000032
│   ├── edits_0000000000000000033-0000000000000000034
│   ├── edits_0000000000000000035-0000000000000000036
│   ├── edits_0000000000000000037-0000000000000000038
│   ├── edits_0000000000000000039-0000000000000000040
│   ├── edits_0000000000000000041-0000000000000000042
│   ├── edits_0000000000000000043-0000000000000000044
│   ├── edits_0000000000000000045-0000000000000000046
│   ├── edits_0000000000000000047-0000000000000000048
│   ├── edits_0000000000000000049-0000000000000000050
│   ├── edits_0000000000000000051-0000000000000000052
│   ├── edits_0000000000000000053-0000000000000000054
│   ├── edits_0000000000000000055-0000000000000000056
│   ├── edits_0000000000000000057-0000000000000000058
│   ├── edits_0000000000000000059-0000000000000000060
│   ├── edits_0000000000000000061-0000000000000000062
│   ├── edits_0000000000000000063-0000000000000000064
│   ├── edits_0000000000000000065-0000000000000000066
│   ├── edits_0000000000000000067-0000000000000000068
│   ├── edits_0000000000000000069-0000000000000000070
│   ├── edits_0000000000000000071-0000000000000000072
│   ├── edits_0000000000000000073-0000000000000000074
│   ├── edits_0000000000000000075-0000000000000000076
│   ├── edits_0000000000000000077-0000000000000000078
│   ├── edits_0000000000000000079-0000000000000000080
│   ├── edits_0000000000000000081-0000000000000000082
│   ├── edits_0000000000000000083-0000000000000000084
│   ├── edits_0000000000000000085-0000000000000000086
│   ├── edits_0000000000000000087-0000000000000000088
│   ├── edits_0000000000000000089-0000000000000000090
│   ├── edits_0000000000000000091-0000000000000000092
│   ├── edits_0000000000000000093-0000000000000000094
│   ├── edits_0000000000000000095-0000000000000000096
│   ├── edits_0000000000000000097-0000000000000000098
│   ├── edits_0000000000000000099-0000000000000000100
│   ├── edits_0000000000000000101-0000000000000000102
│   ├── edits_0000000000000000103-0000000000000000104
│   ├── edits_0000000000000000105-0000000000000000106
│   ├── edits_0000000000000000107-0000000000000000108
│   ├── edits_0000000000000000109-0000000000000000110
│   ├── edits_0000000000000000111-0000000000000000112
│   ├── edits_0000000000000000113-0000000000000000114
│   ├── edits_0000000000000000115-0000000000000000116
│   ├── edits_0000000000000000117-0000000000000000118
│   ├── edits_0000000000000000119-0000000000000000120
│   ├── edits_0000000000000000121-0000000000000000122
│   ├── edits_0000000000000000123-0000000000000000124
│   ├── edits_0000000000000000125-0000000000000000126
│   ├── edits_0000000000000000127-0000000000000000128
│   ├── edits_0000000000000000129-0000000000000000130
│   ├── edits_0000000000000000131-0000000000000000132
│   ├── edits_0000000000000000133-0000000000000000134
│   ├── edits_0000000000000000135-0000000000000000136
│   ├── edits_0000000000000000137-0000000000000000138
│   ├── edits_0000000000000000139-0000000000000000140
│   ├── edits_0000000000000000141-0000000000000000142
│   ├── edits_0000000000000000143-0000000000000000144
│   ├── edits_0000000000000000145-0000000000000000146
│   ├── edits_0000000000000000147-0000000000000000148
│   ├── edits_0000000000000000149-0000000000000000150
│   ├── edits_0000000000000000151-0000000000000000152
│   ├── fsimage_0000000000000000150
│   ├── fsimage_0000000000000000150.md5
│   ├── fsimage_0000000000000000152
│   ├── fsimage_0000000000000000152.md5
│   └── VERSION
└── in_use.lock

1 directory, 72 files

在hdfs-site.xml加入secondary node configuration
ubuntu@nn:~$ sudo cat /opt/hadoop-2.8.2/etc/hadoop/hdfs-site.xml
:::
        <property>
                <name>dfs.namenode.checkpoint.dir</name>
                <value>file:/home/ubuntu/sn</value>
        </property>


</configuration>

Check Secondary NameNode 更新的狀態 default 60 mins refresh
ubuntu@nn:~$ tail -n 30 /tmp/hadoop-ubuntu-secondarynamenode-nn.log
:::
2017-12-11 02:35:03,310 WARN org.apache.hadoop.hdfs.server.namenode.SecondaryNam                                         eNode: Checkpoint done. New Image Size: 618

:::
2017-12-11 02:35:03,310 WARN org.apache.hadoop.hdfs.server.namenode.SecondaryNam                                         eNode: Checkpoint done. New Image Size: 618
:::

是的,可更改設定為10 mins refresh一次 Edit hdfs-stie.xml P6-31

設定Rack Awareness,  將IP address轉為Rack位置 P6-34

HDFS系統空間不足時,可加DataNode P6-36

DataNode運算主機的管理策略 hdfs.allow 白名單  P6-47

HDFS Balance P6-50

NameNode損毀救援 P6-57

HDFS 分散式檔案系統權限設定 P6-65


2017年12月6日 星期三

Download build by wget command


ubuntu@myHDP2:~$ sudo wget "http://javadl.oracle.com/webapps/download/AutoDL?BundleId=227542_e758a0de34e24606bca991d704f6dcbf" -O /opt/jdk-8u151-linux-x64.tar.gz


Saving to: ‘/opt/jdk-8u151-linux-x64.tar.gz’

/opt/jdk-8u151-linu 100%[===================>]  76.32M  5.05MB/s    in 17s

2017-12-06 08:39:10 (4.46 MB/s) - ‘/opt/jdk-8u151-linux-x64.tar.gz’ saved [80025700/80025700]

works
==================================================================

ubuntu@myHDP2:~$ vi getjdk.sh
wget --no-cookies --no-check-certificate --header "Cookie: oraclelicense=accept-
securebackup-cookie" --user=username --password=password "http://down
load.oracle.com/otn/java/jdk/7u80-b15/jdk-7u80-linux-x64.tar.gz" -O /opt/jdk-7u8
0-linux-x64.tar.gz

ubuntu@myHDP2:~$ chmod -x getjdk.sh

ubuntu@myHDP2:~$ ll getjdk.sh                                               
-rwxr-xr-x 1 root root 260 Dec  6 06:54 getjdk.sh*

Execution
ubuntu@myHDP2:~$ sudo ./getjdk.sh

<about with some mistake>

Download from OneDriver
ubuntu@myHDP2:~$wget https://onedrive.live.com/?authkey=%21ADavlcyXpmvrpqA&id=C0A1D52B1A288CA9%213703&cid=C0A1D52B1A288CA9/jdk-7u80-linux-x64.tar.gz


ubuntu@myHDP2:~$ sudo wget "http://javadl.oracle.com/webapps/download/AutoDL?BundleId=227542_e758a0de34e24606bca991d704f6dcbf" -O /opt/jdk-8u151-linux-x64.tar.gz

2017年10月18日 星期三

利用微軟作業系統內建指令XCOPY+Task Scheduler代替備份軟體

微軟作業系統內建指令XCOPY備份功能介紹
您是否曾遇到硬碟或隨身碟故障,導致檔案損壞的情況,此時才後悔沒備份。但備份工作既耗時又常碰到問題,有時備份到一半出現錯誤訊息,到底備份多少也不知道,還要重來!因此,介紹一個具有以下特色的備份方法。
不需購買或安裝軟體
可完全備份或只備份日期較新的檔案
備份的檔案如損壞可以跳過繼續備份其它檔案
可利用系統排程做定時備份
設計原理
建立一個批次執行檔(bat),裡面放一行Windows所提供的XCOPY指令,再加入適當的參數就可以輕鬆完成備份工作。
操作流程
1.執行記事本:點選[程式集]/[附屬應用程式]/[記事本]

2.輸入以下指令(可用複製/貼上功能再自行修改內容)
XCOPY . D:\隨身碟備份\ /D/K/E/Y/C/I/H (不要加H, 很麻煩)

來源:點號 . ,表示複製此批次執行檔所存放位置的所有檔案。
目的:D:\隨身碟備份\,表示複製到目的地為D碟的[隨身碟備份]資料夾內。
參數:/D/K/E/Y/C/I/H,/D只複製比目的檔還新的檔案,/K複製後檔案屬性不變,/E包含子目錄,/Y不要求確認,/C錯誤發生也繼續,/I目的不存在就建立資料夾,/H複製隱藏檔和系統檔。

3.將檔案存在您要備份的磁碟機或資料夾內(一定要切換存檔類型為所有檔案,且副檔名一定要輸入.bat)。


4.用檔案總管點兩下執行設計完成的批次檔(bat檔),開始進行備份工作。


5.往後要做備份,只要點兩下此批次檔即可,且備份速度比第一次快很多哦!(因為它只拷貝比目的檔還新的檔案)

6. 可用工作排程器加入固定排程

Windows XP排程設計
  以上提供的是半自動的備份方法,如果要完成全自動定時做備份的工作可以利用Windows內建的[排定的工作],定時執行我們所建立的批次執行檔(bat),完成定時備份的功能。操作流程如下:
操作流程
1.開啟[程式集]/[附屬應用程式]/[系統工具]/[排定的工作]。
2.點選[下一步] 。
3.按[瀏覽]挑選我們設計好要備份用的批次檔。
4.挑選工作執行的方式,例如:每日、每週、每月。
5.輸入開始時間。
6.輸入此電腦開機時所使用的帳號及密碼。
7.完成。

Example: 2022/05/23 and works
XCOPY D:\Backup\ERP-Backup\ERP*.* F:\ /D/K/E/Y/C/I
forfiles -p "F:" -s -m ERP*.* -d -14 -c "cmd /c del @PATH"

XCOPY指令詳解
XCOPY source [destination] [/A | /M] [/D[:date]] [/P] ..........

source       指定要複製的檔案。
destination  指定位置或者/以及新檔案的名稱。
/A    只複製設定成保存屬性的檔案,不要改變屬性的設定。
/M    只複製設定成保存屬性的檔案,並清除保存屬性。
/D:m-d-y  複製指定日期當天或之後變更的檔案。如果沒給日期,只複製那些來源檔案日期比目的檔案日期為新的檔案。
/EXCLUDE:file1[+file2][+file3]...
        指定檔案清單字串。每個字串應在不同行。如果有字串對應到要進行複製的檔案絕
        對路徑的任何部分,這個檔案會被排除複製。例如,指定字串
        \obj\ 或 .obj 的話,會排除所有在 obj 目錄下副檔名是.obj 的檔案複製。
/P    在建立每個目的檔案時顯示提示。
/S    複製每個目錄及其包含的子目錄,不複製空目錄。
/E    複製每個目錄及其包含的子目錄,也複製空目錄。/S 與 /E相同,能夠用來修改 /T。
/V    驗證每個新檔案。
/W    在複製之前提示您按鍵繼續。
/C    如果錯誤發生時也繼續複製。
/I    如果目的不存在且複製一個以上的檔案的話,就假設指定的目的一定是目錄。
/Q    在複製時不要顯示檔名。
/F    在複製時顯示來源及目的檔案的全部檔名。
/L    顯示要複製的檔案。
/G    允許加密檔案複製到不支援加密的目的地。
/H    複製隱藏檔和系統檔。
/R    覆蓋唯讀檔案。
/T    建立目錄結構,但不複製其中的檔案。不包括空目錄及子目錄。
      /T /E 會包括空目錄及子目錄。
/U    只複製已經存在目的位置的檔案。
/K    複製檔案屬性。通常 Xcopy 會重設唯讀的屬性。
/N    用所產生的短檔名來進行複製。
/O    複製檔案所有權及 ACL 資訊。
/X    複製檔案審查設定 (包含 /O)。
/Y    不要提示您確認是否要覆蓋一個已經存在的檔案。
/-Y    示您確認是否要覆蓋一個已經存在的檔案。
/Z    在可重新開始的模式中複製網路檔案。

2017年10月2日 星期一

如何利用「磁碟清理」工具 安全的騰出系統硬碟的多餘空間

磁碟清理 Server 磁碟空間不足 DISM


Server 磁碟空間不足時可用指令

CMD (run as administrator)

Windows Server 2008 以下

dism /online /cleanup-image /spsuperseded /hidesp

Windows 2012 以上

DISM.exe /online /Cleanup-Image /StartComponentCleanup


參照:http://blog.miniasp.com/post/2014/01/22/Using-Disk-Cleanup-Wizard-delete-outdated-Windows-Update-files.aspx


WIN2012 R2 磁碟清理
如果在WIN2012 R2 要啟用磁碟清理的功能,需要安裝"桌面體驗",才會有磁碟清理的功能。
安裝路徑如圖示


匯出Windows server 有安裝的patch wmic gfe get

wmic qfe get > hotfix.txt

如何清除DNS快取 (Flush DNS)

ipconfig /flushdns

如何清除DNS快取 (Flush DNS)
這個功能一般user應該很少用到,但搞IT的人卻是必備的技能。
當client瀏覽網頁、ping domain時,client PC會先透過DNS Server解析domain-IP的對應,並把結果暫存在cache裡,因此下次再次用到這個domain時,便不需要再次找DNS Server解析,以增加連線效率。
但有時會遇到,暫存的資料實際上已經異動時,client卻不知道,因此不論怎麼連都連不到,此時有幾個辦法可以解決。
1. 重開機
2. Restart 網卡
3. 下指令強制清除cache

在Windows環境下,清除cache的指令如下:
ipconfig /flushdns

在Mac OSX環境下,清除cache的指令如下:
dscacheutil -flushcache

在Linux環境下,清除cache的指令如下:
/etc/init.d/nscd restart

2016年7月10日 星期日

Lab: 利用SCP指令來抓取其他Sensor的資料

i@f1:~$ cat scplog.sh
#!/bin/bash
for x in t01 sensor05 <宣兩個x, 可以用來抓五個sensor>
do
        echo $x: <呼叫x>
done

<結果>
pi@f1:~$ ./scplog.sh
t01:
sensor05:

pi@f1:~$ cat scplog.sh
#!/bin/bash
for x in sensor05 sensor04
do
        echo $x:
        scp -r pi@$x:~/log ~/log_$x
done


pi@f1:~$ . scplog.sh
sensor05:
2016-07-03_10-54-32_0000.log                    0%    0     0.0KB/s   --:--           2016-07-03_10-54-32_0000.log                   52%   80KB  80.0KB/s   00:00           2016-07-03_10-54-32_0000.log                  100%  151KB 151.1KB/s   00:01         
sensor04:
2016-07-03_10-54-19_0000.log                    0%    0     0.0KB/s   --:--           2016-07-03_10-54-19_0000.log                  100%  151KB 151.2KB/s   00:00   


pi@f1:~$ cat hgetxyz.sh
#!/bin/bash
echo head 30
head -30 $1 |cut -d',' -f 1,2,3,4

echo tail 50
tail -30 $1 |cut -d',' -f 1,2,3,4  <以","為依據,取3 4 欄>

<$1 is 參數filename, >

pi@f1:~$ ./hgetxyz.sh s5log
head 30
2016-07-03 14:17:18.096,0.00054785156250,0.00013671875000,-0.00119995117187
2016-07-03 14:17:18.196,-0.00180688476562,0.00102075195312,-0.00022705078125
2016-07-03 14:17:18.296,0.00166357421875,-0.00298144531250,-0.00257177734375
2016-07-03 14:17:18.396,0.00015454101563,0.00097290039062,0.00122583007813
2016-07-03 14:17:18.496,0.00027270507813,0.00037207031250,-0.00054589843750
2016-07-03 14:17:18.596,-0.00045556640625,0.00213696289062,-0.00403442382812


========================================================================
pi@f1:~$ free -mh <Check Memery free>
             total       used       free     shared    buffers     cached
Mem:          434M       107M       327M       4.4M        10M        66M
-/+ buffers/cache:        30M       403M
Swap:          99M         0B        99M
pi@f1:~$ free -mh | grep Mem:
Mem:          434M       107M       327M       4.4M        10M        66M


pi@f1:~$ free -mh | grep Mem: <只要看Memery的>
Mem:          434M       107M       327M       4.4M        10M        66M

pi@f1:~$ free -mh | grep Mem: | fmt -u <去空白>
Mem: 434M 113M 321M 4.4M 12M 66M

pi@f1:~$ free -mh | grep Mem: | fmt -u | cut -d' ' -f 3,4 <以空白為依據,取3 4 欄>
321M

<<Usage: cut OPTION... [FILE]...
Print selected parts of lines from each FILE to standard output.

Mandatory arguments to long options are mandatory for short options too.
  -b, --bytes=LIST        只顯示指定的位元組
  -c, --characters=LIST   只顯示指定的字元
  -d, --delimiter=DELIM   以 DELIM 字元代替 TAB 作為欄位的分隔符號
  -f, --fields=LIST       只顯示指定的欄位;同時也印出不含分隔符號的
                            每一行,除非配合 -s 選項一起使用>>

$ nano happy.sh
#!/bin/bash
echo $0
echo $1

pi@f1:~$ ./happy.sh test
./happy.sh
test
<pi@f1:~$ ./happy.sh=$0 test=$1 $2 $$4...etc>

========================================================================

pi@f1:~$ cat hget.sh
#!/bin/bash

[ "$2" == "x" ] && pos='2'
[ "$2" == "y" ] && pos='3'
[ "$2" == "z" ] && pos='4'

head -$3 $1 | cut -d',' -f $pos

hget.sh filename x, y or z 軸 看幾筆data

pi@f1:~$ ./hget.sh slog x 10
-0.00039184570312
-0.00317431640625
0.00247192382813
....


pi@f1:~$ head -100 slog | tail -10 <去頭尾,抓91-100筆data>
2016-07-03 10:54:48.798,-0.00109228515625,0.00207202148438,-0.00021655273438,0.02820610687023,-0.16757251908397,-0.00180916030534
2016-07-03 10:54:48.855,-0.00082885742188,-0.00034497070312,-0.00089819335938,-0.00667938931298,0.05465648854961,0.02148091603053
2016-07-03 10:54:48.913,0.00055859375000,-0.00090698242187,0.00018261718750,0.02339694656489,0.02916030534351,-0.01624427480916
2016-07-03 10:54:48.970,-0.00262988281250,-0.00032006835937,0.00132153320312,-0.01912977099237,0.00525954198473,-0.02438167938931
2016-07-03 10:54:49.027,-0.00198242187500,0.00033471679688,0.00016479492187,0.00329770992366,0.00109923664122,-0.13952671755725
2016-07-03 10:54:49.084,0.00193701171875,-0.00085595703125,0.00149121093750,-0.02974045801527,0.00515267175572,0.00488549618321
2016-07-03 10:54:49.142,-0.00072534179688,0.00158789062500,0.00089013671875,0.03358778625954,0.05039694656488,-0.00512213740458
2016-07-03 10:54:49.199,0.00189843750000,0.00152978515625,0.00553100585937,-0.02367938931298,0.16738931297709,0.03446564885496
2016-07-03 10:54:49.256,-0.00298730468750,0.00281347656250,-0.00112719726563,0.04851908396947,0.14975572519083,0.02287786259542
2016-07-03 10:54:49.313,-0.00017529296875,-0.00107983398437,0.00490942382812,-0.07195419847328,-0.01506106870230,0.03915267175572

========================================================================<20160710>

2016-07-10 11:17:51.429,-0.00079760742188,-0.00181811523437,0.00048510742189,0.0                                                                             6098473282445,-0.04567938931297,0.01094656488551
2016-07-10 11:17:51.527,0.00232592773437,-0.00061181640625,-0.00099560546873,0.0                                                                             2479389312979,0.02551145038169,0.01803053435116
^CTraceback (most recent call last): <Pause/Break Hold住>
  File "udpserver-31500.py", line 14, in <module>
KeyboardInterrupt
pi@f2:~$ python udpserver-31500.pyc <不能再run python>
2016-07-10 11:18:13.227,-0.00114746093750,0.00103979492188,0.00010009765627,0.02514503816796,-0.02649618320610,-0.00702290076334
2016-07-10 11:18:13.327,0.00427099609375,-0.00095947265625,-0.00217041015623,0.02548854961834,-0.01490076335877,-0.01181679389312
2016-07-10 11:18:13.427,0.00395996093750,0.00142041015625,-0.00017382812498,-0.02041984732823,0.07106106870230,0.02712213740459
2016-07-10 11:18:13.527,-0.00140039062500,0.00150683593750,-0.00091845703123,-0.02818320610685,0.00194656488550,0.03390076335879
2016-07-10 11:18:13.627,0.00058569335937,-0.00225341796875,-0.00426855468748,0.02360305343513,-0.04029007633587,-0.02203053435113
2016-07-10 11:18:13.727,0.00040820312500,0.00221728515625,0.00067846679689,0.03146564885498,0.03880916030535,0.07345038167940
2016-07-10 11:18:13.827,-0.00057128906250,-0.00056274414062,0.00236718750002,-0.05786259541983,0.01812213740459,0.01145801526719
2016-07-10 11:18:13.927,-0.00266284179688,-0.00056250000000,0.00105346679689,-0.01245801526716,-0.03738931297709,-0.04892366412212
2016-07-10 11:18:14.027,-0.00137426757813,-0.00089746093750,-0.00007177734373,-0.00997709923662,0.07964885496184,0.01810687022902
2016-07-10 11:18:14.127,-0.00000244140625,0.00146606445313,0.00356005859377,-0.01176335877861,-0.07436641221373,-0.00686259541983
2016-07-10 11:18:14.241,-0.00203076171875,-0.00160766601562,-0.00125390624998,-0.01373282442746,0.01701526717558,-0.02551908396945
2016-07-10 11:18:14.327,-0.00383081054688,0.00154394531250,0.00333105468752,0.00656488549620,-0.02378625954198,0.02474045801528
2016-07-10 11:18:14.427,0.00041870117187,-0.00128198242187,-0.00051879882811,-0.02067938931296,-0.02874045801526,0.00209160305345
2016-07-10 11:18:14.527,0.00194580078125,-0.00213330078125,-0.00163452148436,-0.01911450381677,0.04043511450382,-0.00919083969464
2016-07-10 11:18:14.627,-0.00011596679688,-0.00053417968750,-0.00098754882811,0.01910687022903,-0.04928244274808,0.03093129770994
2016-07-10 11:18:14.727,-0.00079785156250,-0.00130029296875,0.00090625000002,0.04080152671758,-0.00109160305343,-0.00676335877861
2016-07-10 11:18:14.827,0.00193798828125,0.00142358398438,-0.00251708984373,-0.03312977099235,0.04287022900764,-0.01983206106869
2016-07-10 11:18:14.927,0.00292260742187,0.00003540039063,-0.00014086914061,0.00106870229009,-0.02904580152671,-0.05447328244273
2016-07-10 11:18:15.027,-0.00287597656250,0.00041064453125,-0.00179418945311,-0.00735114503815,0.01086259541985,-0.00489312977098
2016-07-10 11:18:15.127,0.00320825195312,-0.00087524414062,0.00015112304689,-0.00666412213739,0.02646564885497,-0.01343511450380
2016-07-10 11:18:15.227,-0.00009814453125,-0.00151171875000,0.00049121093752,-0.00761068702288,-0.05738167938931,0.00277862595421
^Z
[1]+  Stopped                 python udpserver-31500.pyc
pi@f2:~$ python udpserver-31500.pyc
Traceback (most recent call last):
  File "udpserver-31500.py", line 11, in <module>
  File "/usr/lib/python2.7/socket.py", line 224, in meth
    return getattr(self._sock,name)(*args)
socket.error: [Errno 98] Address already in use
pi@f2:~$ fg <回到前景>

2016年6月29日 星期三

SCP 指令

<SCP 傳送檔案>
pi@f1:~/smile$ scp office.txt pi@f4:~ <傳送到f4 host pi的home directory>
pi@f4's password:
office.txt                                      0%    0     0.0KB/s   --:--
office.txt                                    100%   55     0.1KB/s   00:00

<Verify it is completed>
pi@f4:~$ ls
office.txt  smile  test.txt

pi@f1:~$ scp -r smile pi@f4:~ <SCP 傳送整個目錄>
pi@f4's password:
office.txt                                      0%    0     0.0KB/s   --:-- office.txt                                    100%   55     0.1KB/s   00:00
office2.txt                                     0%    0     0.0KB/s   --:-- office2.txt                                   100%   55     0.1KB/s   00:00

 <Verify it is completed>

<SCP 抓取檔案>
pi@f1:~$ scp pi@f4:~/f4test.txt ~
pi@f4's password:
f4test.txt                                      0%    0     0.0KB/s   --:-- f4test.txt                                    100%   22     0.0KB/s   00:00
pi@f1:~$ ls
0626  auto.sh  f4test.txt  hello  smile  test.txt
pi@f1:~$ cat f4test.txt
abcd1234567890

<SCP 抓取整個目錄>
pi@f1:~/f4$ scp -r pi@f4:~/smile ~/f4
pi@f4's password:
office.txt                                      0%    0     0.0KB/s   --:-- office.txt                                    100%   55     0.1KB/s   00:00
office                                          0%    0     0.0KB/s   --:-- office                                        100%   12     0.0KB/s   00:00
office2.txt                                     0%    0     0.0KB/s   --:-- office2.txt                                   100%   55     0.1KB/s   00:00

2016年6月19日 星期日

Linux 指令小復習

Linux不用副檔名
r: read
w: write
x: execute

drwxr-xr-x 3 pi   pi   4096 Nov 21 22:55 .
drwxr-xr-x 3 root root 4096 Nov 21 20:32 ..
-rw-r--r-- 1 pi   pi      0 Nov 21 22:13 return

directory-Owner-Group-Others

pi@raspberrypi:~$ ls -al
total 28
drwxr-xr-x 3 pi   pi   4096 Nov 21 22:55 .
drwxr-xr-x 3 root root 4096 Nov 21 20:32 ..
-rw------- 1 pi   pi   1949 Nov 21 22:22 .bash_history
-rw-r--r-- 1 pi   pi    220 Nov 21 20:32 .bash_logout
-rw-r--r-- 1 pi   pi   3512 Nov 21 20:32 .bashrc
-rw-r--r-- 1 pi   pi      0 Nov 21 22:13 popd
-rw-r--r-- 1 pi   pi    675 Nov 21 20:32 .profile
drwxr-xr-x 2 pi   pi   4096 Nov 21 22:55 raspberrypi
-rw-r--r-- 1 pi   pi      0 Nov 21 22:13 return
-rw-r--r-- 1 pi   pi      0 Nov 21 22:13 source
-rw-r--r-- 1 pi   pi      0 Nov 21 22:13 times
-rw-r--r-- 1 pi   pi      0 Nov 21 22:13 true


root@f1:/etc# more passwd <查看檔案內容>
root@f1:/etc# cat passwd
root:x:0:0:root:/root:/bin/bash
daemon:x:1:1:daemon:/usr/sbin:/usr/sbin/nologin
bin:x:2:2:bin:/bin:/usr/sbin/nologin
sys:x:3:3:sys:/dev:/usr/sbin/nologin

pi@f1:~$ head -n 2 /etc/passwd <查看檔案前二行內容>
root:x:0:0:root:/root:/bin/bash
daemon:x:1:1:daemon:/usr/sbin:/usr/sbin/nologin

pi@f1:~$ tail -n 2 /etc/passwd <查看檔案後二行內容>
ntp:x:107:112::/home/ntp:/bin/false
statd:x:108:65534::/var/lib/nfs:/bin/false

pi@f1:~$ alias <查詢自定命令>
alias egrep='egrep --color=auto'
alias fgrep='fgrep --color=auto'
alias grep='grep --color=auto'
alias ls='ls --color=auto'

pi@f2:~$ sudo ping f1 -c 4 <ping 4個package 自動停>
PING f1 (172.20.110.150) 56(84) bytes of data.
64 bytes from f1 (172.20.110.150): icmp_seq=1 ttl=64 time=0.172 ms
64 bytes from f1 (172.20.110.150): icmp_seq=2 ttl=64 time=0.189 ms
64 bytes from f1 (172.20.110.150): icmp_seq=3 ttl=64 time=0.151 ms
64 bytes from f1 (172.20.110.150): icmp_seq=4 ttl=64 time=0.151 ms

pi@f1:~$ alias ping='sudo ping -c 4' <自訂命令>

pi@f1:~$ ping 172.20.110.254 <test自訂命令生效>
PING 172.20.110.254 (172.20.110.254) 56(84) bytes of data.
64 bytes from 172.20.110.254: icmp_seq=1 ttl=64 time=0.497 ms
64 bytes from 172.20.110.254: icmp_seq=2 ttl=64 time=0.426 ms
64 bytes from 172.20.110.254: icmp_seq=3 ttl=64 time=0.460 ms
64 bytes from 172.20.110.254: icmp_seq=4 ttl=64 time=0.464 ms

--- 172.20.110.254 ping statistics ---
4 packets transmitted, 4 received, 0% packet loss, time 2997ms
rtt min/avg/max/mdev = 0.426/0.461/0.497/0.036 ms

pi@f1:~$ alias <查看自訂的命令>
alias egrep='egrep --color=auto'
alias fgrep='fgrep --color=auto'
alias grep='grep --color=auto'
alias ls='ls --color=auto'
alias ping='sudo ping -c 4' <自訂的>

pi@f1:~$ unalias ping <移除自訂命令>

pi@f1:~$ alias dir='ls -al'
pi@f1:~$ alias ll='ls -al'
pi@f1:~$ dir
總計 28
drwxr-xr-x 2 pi   pi   4096 11月 21  2015 .
drwxr-xr-x 3 root root 4096 11月 21  2015 ..
-rw------- 1 pi   pi    294  6月 26 03:26 .bash_history
-rw-r--r-- 1 pi   pi    220 11月 21  2015 .bash_logout
-rw-r--r-- 1 pi   pi   3512 11月 21  2015 .bashrc
-rw-r--r-- 1 pi   pi    675 11月 21  2015 .profile
-rw-r--r-- 1 pi   pi     43 11月 21  2015 test.txt
pi@f1:~$ ll
總計 28
drwxr-xr-x 2 pi   pi   4096 11月 21  2015 .
drwxr-xr-x 3 root root 4096 11月 21  2015 ..
-rw------- 1 pi   pi    294  6月 26 03:26 .bash_history
-rw-r--r-- 1 pi   pi    220 11月 21  2015 .bash_logout
-rw-r--r-- 1 pi   pi   3512 11月 21  2015 .bashrc
-rw-r--r-- 1 pi   pi    675 11月 21  2015 .profile
-rw-r--r-- 1 pi   pi     43 11月 21  2015 test.txt

pi@f1:~$ free -mh <查看記憶體>
             total       used       free     shared    buffers     cached
Mem:          434M       368M        65M       4.4M        35M       292M
-/+ buffers/cache:        40M       393M
Swap:          99M         0B        99M

pi@f1:~$ echo Max New Line <回聲 echo>
Max New Line
pi@f1:~$ echo -n Max NO New Line
Max NO New Linepi@f1:~$


 pi@f1:~$ nano hello <利用nano寫一個bash file>
echo -n hello!
echo how are you

<Save 但權限不能run>
-bash: ./hello: 拒絕不符權限的操作
-rw-r--r-- 1 pi   pi     33  6月 26 05:35 hello

pi@f1:~$ chmod +x hello

pi@f1:~$ ./hello
hello!how are you


pi@f1:~$ nano auto.sh <利用nano寫一個系統維運指令-1><以後重開機可以執行就有習慣指令環境>
#!/bin/bash
alias ll='ls -al'
alias dir='ls -al'
alias reboot='sudo reboot'
alias bye='sudo shutdown -h now'
alias ping='sudo ping -c 4'

. auto.sh <run auto.sh 套用以上alias>

再寫入home directory .bashrc file

nano ~/.bashrc

......
  elif [ -f /etc/bash_completion ]; then
    . /etc/bash_completion
  fi
fi
. ~/auto.sh
<加在file end>

reboot and verify enable okay.


pi@f1:~$ cat hello > 0626 <output overwrite to 0626 覆寫>
pi@f1:~$ more 0626
echo -n hello!
echo how are you
pi@f1:~$ cat hello >> 0626 <output do NOT overwrite to 0626 增加新行>
pi@f1:~$ more 0626
echo -n hello!
echo how are you
echo -n hello!

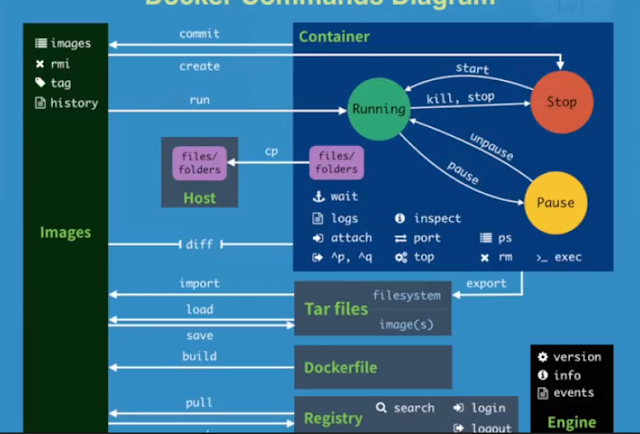
Docker Command

#1 pull images $docker pull chusiang/takaojs1607 #2 list images $docker images #3.1 run docker $docker run -it ### bash #3.2 run do...