顯示具有 Container 標籤的文章。 顯示所有文章

2018年2月12日 星期一

Windows Containers 容器技術 - 建立IIS容器


Download IIS Container Image from Docker Hub

docker pull microsoft/iis


docker run --name iis1 -d -p 8080:80 microsoft/iis
-d 進入detach 背景模式
-p 8080:80 設定主機8080 port 對應到容器80 port


docker exec -it iis1 cmd


refer: https://www.slideshare.net/WillHuangTW/windows-containers-docker-taipei

How do I publicly host my website on EC2 Windows using IIS?
https://aws.amazon.com/premiumsupport/knowledge-center/public-website-ec2-iis/

2018年1月10日 星期三

Windows 2016 Container


Docker源自Linux核心的系統層功能,如控制資源的控制群組機制cgroups、命名空間Namespaces,還有實現層級化功能的共通檔案系統AUFS等,這些都是在Windows所沒有的功能。


類型1:Windows Server容器


微軟設計了兩種容器,第一種稱為Windows Server容器,這很像是Linux上的Docker容器,和其他容器共用同一套Host作業系統的核心。也可以使用Dockerfile來建立描述性的映象檔。


類型2:Hyper-V容器


另一種Windows容器稱為Hyper-V容器,像是一個包在Hyper-V特殊型VM內的Windows Server容器,會有一份專屬OS核心,而不與其他容器共用Host核心。和Windwos Server容器一樣支援相同的Dockerfile映象檔。


微軟首先在新版Windows 中實現了容器需要的三種系統層機制,

控制群組機制(微軟稱為Job objects),

命名空間機制(包括了Object Namespace、Process Table和Networking)

以及層級能力,來提供作業系統層級的運算服務層(Compute Service),

才在Windows上打造出了能與Docker 相容的Container技術。


不只是重現Linux機制,微軟還得兼顧與Windows的相容性,理,例如在命名空間的設計上,微軟除了增加了Silo\來管理Windows系統資源的起點,如\Silos\foo,也將Windows環境下常用的目錄如C:\或C:\Windwos,在Windows容器中,也改由Object namespace來管理,變成了\DosDevices\C:和\DosDevices\C:\Windwos等存取路徑。


微軟設計了兩種Windows Container(簡稱Windows容器),

一種共用系統核心資源的Windows Server Container(簡稱Windows Server容器),

另一種則是有自己獨立系統核心資源的Hyper-V Container(簡稱Hyper-V容器)。

Windows Server容器更像是Linux上的Docker容器,和其他容器共用同一套Host作業系統的核心,

而Hyper-V Container則會有一份專用的作業系統核心,而不會共用Host核心。在同一個作業系統環境中,可以同時執行這兩類的Windows容器。


在Windows作業系統內的Docker引擎,可以呼叫這些Windows系統層級的運算服務來執行和管理Windows容器,就如同在Docker引擎在Linux環境中透過containerd和runc服務來管理Linux容器一樣。從載入Docker映象檔來布建應用的流程來看,Docker引擎成了開發者唯一要面對的作業系統環境抽象層,而不用擔心底層容器技術如何運作,幾乎所有的Docker指令都同樣可以在Windows環境下執行,只有少數指令的運作和Linux環境不同,例如不支援FROM scratch指令。


Windows容器的Dockerfile有點不同


Windows容器同樣也可以使用Dockerfile來建立描述性的映象檔,來將Windows基礎架構配置程式化,微軟還推出了支援Docker的PowerShell指令,可用於命令列模式下,搭配Docker指令來管理Windows容器。


幾乎大多數Docker指令可用於Windows環境中,例如要注意反斜線逸出如WORKDIR c:\\Apache24\\bin才有效。另外,可以在Dockerfile檔中用RUN powershell.exe來執行PowerShell指令設定環境配置。這也意味著Linux環境的Dockerfile得費一番功夫調整才能用於Windows環境。


目前,Windows容器的Dockerfile只能使用兩種基礎映象檔(Base image)來建立容器,一個是windowservercore基礎映象檔(檔案超大約6 GB,但相容性高)和nanoserver基礎映象檔(檔案小約5百MB,啟動速度快,簡單API介面),而無法使用Linux類基礎映象檔,如Docker開發者慣用的Ubuntu,來建立Windows容器。使用這兩種基礎映象檔建立的Dockerfile都可用來建立Windows Server容器或Hyper-V容器。


微軟目前正式推出的是Docker on Windows,可以做到在Windows上能跑Docker,包括Window Server 2016和Windows 10都已支援,但微軟下一步想要實現的是Docker for Windows,能夠將Docker技術高度整合到Windows內,做到可以同時在Windows環境內執行任何類型的Docker容器,也就是能同時執行Windows類容器和Linux類容器,如此一來就「可以在Windows上平行執行Windows應用和Linux應用了」。


Container is a kitchen


Imagine a kitchen. We package up all the appliances and furniture, the pots and pans, the dish soap and hand towels. This is our container


We can now take this container and drop it into whatever host apartment we want, and it will be the same kitchen. All we must do is connect electricity and water to it, and then we’re clear to start cooking (because we have all the appliances we need!)


Container Fundamentals


An application or process which runs in a container is packaged with all the required dependencies and configuration files;


The following key concepts will be helpful as you begin creating and working with Windows Containers.


Container Host: Physical or Virtual computer system configured with the Windows Container feature. The container host will run one or more Windows Containers.


Container Image: As modifications are made to a containers file system or registry—such as with software installation—they are captured in a sandbox. In many cases you may want to capture this state such that new containers can be created that inherit these changes. That’s what an image is – once the container has stopped you can either discard that sandbox or you can convert it into a new container image. For example, let’s imagine that you have deployed a container from the Windows Server Core OS image. You then install MySQL into this container. Creating a new image from this container would act as a deployable version of the container. This image would only contain the changes made (MySQL), however it would work as a layer on top of the Container OS Image.


Sandbox: Once a container has been started, all write actions such as file system modifications, registry modifications or software installations are captured in this ‘sandbox’ layer.


Container OS Image: Containers are deployed from images. The container OS image is the first layer in potentially many image layers that make up a container. This image provides the operating system environment. A Container OS Image is immutable. That is, it cannot be modified.


Container Repository: Each time a container image is created, the container image and its dependencies are stored in a local repository. These images can be reused many times on the container host. The container images can also be stored in a public or private registry, such as DockerHub, so that they can be used across many different container hosts.


refer: https://docs.microsoft.com/en-us/virtualization/windowscontainers/about/


For example, you can use containers to spin up light-weight and portable app components – or ‘micro-services’ – for distributed apps and quickly scale each service separately.

快速上手 Windows Containers 容器技術


Launch AWS new instance - Microsoft Windows Server 2016 Base with Containers <Free>
Launch Command Line Console
Docker


C:\Users\Administrator>docker run --name new1 -it microsoft/windowsservercore cmd
run new container and name is new1
-i Keep STDIN open event if not attached
-t Allocate a pseudo-TTY
Base image microsoft/windowserververcore 
Download -> Extract -> Execute


 This is a container OS cmd

List running Containers
C:\Users\Administrator>docker ps -a

Stop Container

Delete Container

List local Container images


2017年12月6日 星期三

Mount Physical Host file system to Container


Physical host file system and source build

1. Ensure Container is shutdown

2. Edit config file
$ sudo vi /var/lib/lxc/myHDP2/config
:::
# Common configuration
lxc.include = /usr/share/lxc/config/ubuntu.common.conf

# Container specific configuration
lxc.rootfs = /var/lib/lxc/myHDP2/rootfs
lxc.rootfs.backend = dir
lxc.mount = /var/lib/lxc/myHDP2/fstab (Added it)
lxc.utsname = myHDP2
lxc.arch = amd64
:::

3. Edit fstab file
$ sudo cat /var/lib/lxc/myHDP2/fstab
/opt /var/lib/lxc/myHDP2/rootfs/opt none bind 0 0

4. Container power on
5. Check file system


Refer: Ubuntu 和 LXC Container 互相存取檔案
Read more: http://www.arthurtoday.com/2015/03/ubuntu-exchanges-data-with-containers.html#ixzz50XjXu0wFhttp://www.arthurtoday.com/2015/03/ubuntu-exchanges-data-with-containers.html

2017年12月5日 星期二

Manage Linux Container Virtual Networking

Default virtual bridge and TUN/TAP virtual NIC


ubuntu@ip-172-31-16-58:~$ brctl show
bridge name     bridge id                          STP enabled     interfaces
lxcbr0               8000.00163e000000       no                      vethRGKXHK

lxcbr0 is  virtual bridg from LXC core model

LXC 預設 NAT (iptables) 檢查IP Table 
ubuntu@ip-172-31-16-58:~$ sudo iptables -t nat -L -n
Chain PREROUTING (policy ACCEPT)
target     prot opt source               destination

Chain INPUT (policy ACCEPT)
target     prot opt source               destination

Chain OUTPUT (policy ACCEPT)
target     prot opt source               destination

Chain POSTROUTING (policy ACCEPT)
target                    prot opt source               destination
MASQUERADE  all  --    10.0.3.0/24         !10.0.3.0/24

MASQUERADE=IP  偽裝(IP MAsquerading), 將內部VM private IP transfer成連結外部網路的IP address.


LXC 預設 DHCP Server and DNS Cache Server (dnsmasq) 
ubuntu@ip-172-31-16-58:~$ ps aux | grep dnsmasq
lxc-dns+  5679  0.0  0.0  49984   380 ?        S    07:08   0:00 dnsmasq -u lxc-dnsmasq --strict-order --bind-interfaces --pid-file=/run/lxc/dnsmasq.pid --listen-address 10.0.3.1 --dhcp-range 10.0.3.2,10.0.3.254 --dhcp-lease-max=253 --dhcp-no-override --except-interface=lo --interface=lxcbr0 --dhcp-leasefile=/var/lib/misc/dnsmasq.lxcbr0.leases --dhcp-authoritative
ubuntu   29294  0.0  0.0  12944   944 pts/0    S+   08:39   0:00 grep --color=auto dnsmasq
ubuntu@ip-172-31-16-58:~$

內部VM private IP: 10.0.3.2 - 10.0.3.254
內部 Private Network Default Gateway:10.0.3.1 

可修改預設虛擬網路架構Edit /etx/default/lxc-net


ubuntu@ip-172-31-16-58:~$ more /etc/default/lxc-net
:::
# bridge, or mavlan to your host's NIC.
USE_LXC_BRIDGE="true"

# If you change the LXC_BRIDGE to something other than lxcbr0, then
# you will also need to update your /etc/lxc/default.conf as well as the
# configuration (/var/lib/lxc/<container>/config) for any containers
# already created using the default config to reflect the new bridge
# name.
# If you have the dnsmasq daemon installed, you'll also have to update
# /etc/dnsmasq.d/lxc and restart the system wide dnsmasq daemon.
LXC_BRIDGE="lxcbr0"
LXC_ADDR="10.0.3.1"
LXC_NETMASK="255.255.255.0"
LXC_NETWORK="10.0.3.0/24"
LXC_DHCP_RANGE="10.0.3.2,10.0.3.254"
LXC_DHCP_MAX="253"
# Uncomment the next line if you'd like to use a conf-file for the lxcbr0
# dnsmasq.  For instance, you can use 'dhcp-host=mail1,10.0.3.100' to have
# container 'mail1' always get ip address 10.0.3.100.

#LXC_DHCP_CONFILE=/etc/lxc/dnsmasq.conf
:::

可新建使用自訂的Virtual Bridge => skip
可讓LXC Virtual Machine獨佔實體網路卡 => skip AWS instance只有一張NIC,可加

Manage LXC Virtual Machines


Start VM

ubuntu@ip-172-31-16-58:~$ sudo lxc-start -n myBig1 (default start vm by backend)

Connect by Console

ubuntu@ip-172-31-16-58:~$ sudo lxc-console -n myBig1

Connected to tty 1
                  Type <Ctrl+a q> to exit the console, <Ctrl+a Ctrl+a> to enter Ctrl+a itself

Ubuntu 16.04.3 LTS myBig1 pts/0

myBig1 login: ubuntu (default from template)
Password:
Welcome to Ubuntu 16.04.3 LTS (GNU/Linux 4.4.0-1041-aws x86_64)

 * Documentation:  https://help.ubuntu.com
 * Management:     https://landscape.canonical.com
 * Support:        https://ubuntu.com/advantage

The programs included with the Ubuntu system are free software;
the exact distribution terms for each program are described in the
individual files in /usr/share/doc/*/copyright.

Ubuntu comes with ABSOLUTELY NO WARRANTY, to the extent permitted by
applicable law.

To run a command as administrator (user "root"), use "sudo <command>".
See "man sudo_root" for details.

ubuntu@myBig1:~$ hostname
myBig1
ubuntu@myBig1:~$ ifconfig
eth0      Link encap:Ethernet  HWaddr 00:16:3e:2e:90:28
          inet addr:10.0.3.36  Bcast:10.0.3.255  Mask:255.255.255.0 (使用A class networking)
          inet6 addr: fe80::216:3eff:fe2e:9028/64 Scope:Link
          UP BROADCAST RUNNING MULTICAST  MTU:1500  Metric:1
          RX packets:13 errors:0 dropped:0 overruns:0 frame:0
          TX packets:11 errors:0 dropped:0 overruns:0 carrier:0
          collisions:0 txqueuelen:1000
          RX bytes:1554 (1.5 KB)  TX bytes:1374 (1.3 KB)

lo        Link encap:Local Loopback
          inet addr:127.0.0.1  Mask:255.0.0.0
          inet6 addr: ::1/128 Scope:Host
          UP LOOPBACK RUNNING  MTU:65536  Metric:1
          RX packets:0 errors:0 dropped:0 overruns:0 frame:0
          TX packets:0 errors:0 dropped:0 overruns:0 carrier:0
          collisions:0 txqueuelen:1
          RX bytes:0 (0.0 B)  TX bytes:0 (0.0 B)


ubuntu@myBig1:~$ ubuntu@ip-172-31-16-58:~$  (Type <Ctrl+a q> to 離開 console)

查詢LXC VM Status

ubuntu@ip-172-31-16-58:~$ sudo lxc-ls -f
NAME          STATE   AUTOSTART GROUPS IPV4      IPV6
myBig1        RUNNING 0         -      10.0.3.36 -
myBig1_Backup STOPPED 0         -      -         -


ubuntu@ip-172-31-16-58:~$ sudo lxc-start -n myBig1
ubuntu@ip-172-31-16-58:~$ sudo lxc-stop -n myBig1

自訂Linux 指令 Edit .bashrc file

End of +
alias ping='ping -c 4'
alias bye='sudo shutdown -h now'

中文化 skip
終端機分頁 skip?
Batch start/stop VM skip

2017年12月4日 星期一

Create LXC Virtual Machine on AWS Ubuntu 16 Container


更新系統套件

ubuntu@ip-172-31-16-58:~$ sudo apt-get update
Hit:1 http://ap-northeast-1.ec2.archive.ubuntu.com/ubuntu xenial InRelease
Get:2 http://ap-northeast-1.ec2.archive.ubuntu.com/ubuntu xenial-updates InRelease [102 kB]
Get:3 http://ap-northeast-1.ec2.archive.ubuntu.com/ubuntu xenial-backports InRelease [102 kB]
Get:4 http://ap-northeast-1.ec2.archive.ubuntu.com/ubuntu xenial/main Sources [868 kB]
Get:5 http://ap-northeast-1.ec2.archive.ubuntu.com/ubuntu xenial/restricted Sources [4,808 B]
:::

Get:38 http://security.ubuntu.com/ubuntu xenial-security/multiverse Translation-en [1,336 B]
Fetched 24.5 MB in 4s (5,661 kB/s)
Reading package lists... Done

ubuntu@ip-172-31-16-58:~$ sudo apt-get upgrade
Reading package lists... Done
Building dependency tree
Reading state information... Done
Calculating upgrade... Done
The following packages will be upgraded:
  curl dnsmasq-base dpkg klibc-utils libcurl3-gnutls libdb5.3 libklibc libpython3.5 libpython3.5-minimal
  libpython3.5-stdlib lxcfs python3.5 python3.5-minimal
13 upgraded, 0 newly installed, 0 to remove and 0 not upgraded.
Need to get 9,338 kB of archives.
After this operation, 21.5 kB of additional disk space will be used.
Do you want to continue? [Y/n] Y

安裝LXC core model

ubuntu@ip-172-31-16-58:~$ sudo apt-get install lxc
Reading package lists... Done
Building dependency tree
Reading state information... Done
The following additional packages will be installed:
  bridge-utils cloud-image-utils debootstrap distro-info genisoimage libaio1 libboost-iostreams1.58.0
  libboost-random1.58.0 libboost-system1.58.0 libboost-thread1.58.0 libiscsi2 libnspr4 libnss3 libnss3-nssdb
  libpam-cgfs librados2 librbd1 lxc-templates lxc1 python3-lxc qemu-block-extra qemu-utils sharutils
Suggested packages:
  cloud-utils-euca shunit2 wodim cdrkit-doc qemu-user-static lxctl bsd-mailx | mailx
The following NEW packages will be installed:
  bridge-utils cloud-image-utils debootstrap distro-info genisoimage libaio1 libboost-iostreams1.58.0
  libboost-random1.58.0 libboost-system1.58.0 libboost-thread1.58.0 libiscsi2 libnspr4 libnss3 libnss3-nssdb
  libpam-cgfs librados2 librbd1 lxc lxc-templates lxc1 python3-lxc qemu-block-extra qemu-utils sharutils
0 upgraded, 24 newly installed, 0 to remove and 0 not upgraded.
Need to get 6,843 kB of archives.
After this operation, 26.1 MB of additional disk space will be used.
Do you want to continue? [Y/n] Y

Check LXC 虛擬主機範本有那些

ubuntu@ip-172-31-16-58:~$ ll /usr/share/lxc/templates
total 412
drwxr-xr-x 2 root root  4096 Dec  5 07:08 ./
drwxr-xr-x 6 root root  4096 Dec  5 07:08 ../
-rwxr-xr-x 1 root root 13042 Jun 14 20:15 lxc-alpine*
-rwxr-xr-x 1 root root 13737 Jun 14 20:15 lxc-altlinux*
-rwxr-xr-x 1 root root 11156 Jun 14 20:15 lxc-archlinux*
-rwxr-xr-x 1 root root 11649 Jun 14 20:15 lxc-busybox*
-rwxr-xr-x 1 root root 29725 Jun 14 20:15 lxc-centos*
-rwxr-xr-x 1 root root 10374 Jun 14 20:15 lxc-cirros*
-rwxr-xr-x 1 root root 20171 Jun 14 20:15 lxc-debian*
-rwxr-xr-x 1 root root 18197 Jun 14 20:15 lxc-download*
-rwxr-xr-x 1 root root 49693 Jun 14 20:15 lxc-fedora*
-rwxr-xr-x 1 root root 28259 Jun 14 20:15 lxc-gentoo*
-rwxr-xr-x 1 root root 13849 Jun 14 20:15 lxc-openmandriva*
-rwxr-xr-x 1 root root 15910 Jun 14 20:15 lxc-opensuse*
-rwxr-xr-x 1 root root 41596 Jun 14 20:15 lxc-oracle*
-rwxr-xr-x 1 root root 11463 Jun 14 20:15 lxc-plamo*
-rwxr-xr-x 1 root root 19096 Jun 14 20:15 lxc-slackware*
-rwxr-xr-x 1 root root 26667 Jun 14 20:15 lxc-sparclinux*
-rwxr-xr-x 1 root root  6822 Jun 14 20:15 lxc-sshd*
-rwxr-xr-x 1 root root 25703 Jun 14 20:15 lxc-ubuntu*
-rwxr-xr-x 1 root root 11734 Jun 14 20:15 lxc-ubuntu-cloud*

建立LXC Virtual Machine

ubuntu@ip-172-31-16-58:~$ sudo lxc-create -t ubuntu -n myBig1
:::
  en_US.UTF-8... done
Generation complete.
Creating SSH2 RSA key; this may take some time ...
2048 SHA256:KYqB7UzN+QbBtdS0+MrWd0ei6Tl3ho0TppBVoQz+uuw root@ip-172-31-16-58 (RSA)
Creating SSH2 DSA key; this may take some time ...
1024 SHA256:241q0S+tE2CVTJ1el8UiZ3rkqAw9YIxdUaMOm8qTpOE root@ip-172-31-16-58 (DSA)
Creating SSH2 ECDSA key; this may take some time ...
256 SHA256:LZ5vr5pi/8CNPFPW8IPGYmoH7tcJ7Ih7idF6bKfltUk root@ip-172-31-16-58 (ECDSA)
Creating SSH2 ED25519 key; this may take some time ...
256 SHA256:cfF3FfPC2G4zI7Xz/d1wHntIVijYQcJdISrxiuGAyHs root@ip-172-31-16-58 (ED25519)
invoke-rc.d: could not determine current runlevel
invoke-rc.d: policy-rc.d denied execution of start.

Current default time zone: 'Etc/UTC'
Local time is now:      Tue Dec  5 07:23:42 UTC 2017.
Universal Time is now:  Tue Dec  5 07:23:42 UTC 2017.


##
# The default user is 'ubuntu' with password 'ubuntu'!
# Use the 'sudo' command to run tasks as root in the container.
##

顯示VM的目錄內容

ubuntu@ip-172-31-16-58:~$ sudo tree -L 2 /var/lib/lxc
/var/lib/lxc
└── myBig1
    ├── config
    └── rootfs

Start and Stop Container VM

ubuntu@ip-172-31-16-58:~$ sudo lxc-start -n myBig1
lxc-start: tools/lxc_start.c: main: 301 Container is already running.
ubuntu@ip-172-31-16-58:~$ sudo lxc-stop -n myBig1

複製 LXC VM
ubuntu@ip-172-31-16-58:~$ sudo lxc-clone -o myBig1 -n myBig1_Backup
lxc-clone is deprecated in favor of lxc-copy.

Created container myBig1_Backup as copy of myBig1

ubuntu@ip-172-31-16-58:~$ sudo lxc-destroy -n myBig1_Backup (刪除 LXC VM)

ubuntu@ip-172-31-16-58:~$ sudo tree -L 2 /var/lib/lxc
/var/lib/lxc
├── myBig1
│   ├── config
│   └── rootfs
└── myBig1_Backup
    ├── config
    └── rootfs

4 directories, 2 files


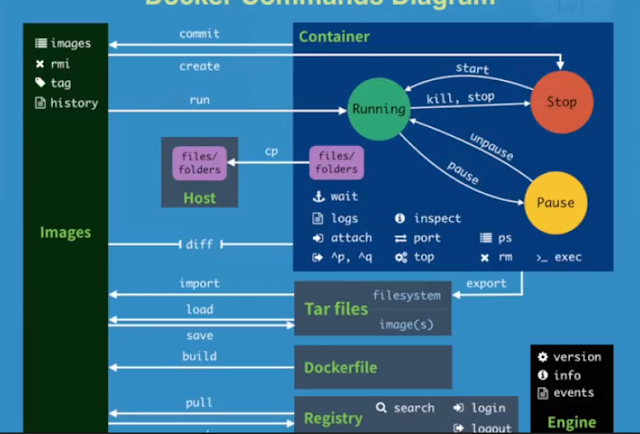
Docker Command

#1 pull images $docker pull chusiang/takaojs1607 #2 list images $docker images #3.1 run docker $docker run -it ### bash #3.2 run do...