顯示具有 Arduino 標籤的文章。 顯示所有文章

2017年11月30日 星期四

Arduino微笑偵測器


Arduino

臉部 API 
這份 API 金鑰目前使用中 
尚餘 30
偵測、識別、分析、組織和標記相片中的臉孔
30,000 筆交易,每分鐘 20 筆。
端點: https://westcentralus.api.cognitive.microsoft.com/face/v1.0
金鑰 1: 69def20442884f59afa6f7f9009f99fd

金鑰 2: e457f2ac2447475cacf9bddbbc9cb22e


Maxde-MBP:downloads max$ vi faceapi_arduino.py

    a = parsed[0]["faceAttributes"]["smile"]   #顯示微笑程度
    conn.close()

except Exception as e:
    print("[Errno {0}] {1}".format(e.errno, e.strerror))

print "smile value is"
print a                                #顯示微笑程度
if a > 0.75:                         #以下分成三個區間來控制LED,您可以自行修改
    board.digital[9].write(1)
    board.digital[10].write(1)
    board.digital[11].write(1)
    print 111
elif a < 0.25:
    board.digital[9].write(1)
    board.digital[10].write(0)
    board.digital[11].write(0)
    print 100
else:
    board.digital[9].write(1)
    board.digital[10].write(1)
    board.digital[11].write(0)
    print 110


2017年11月16日 星期四

Arduino, Python Firmata


$sudo pip install pySerial
$sudo pip install pyfirmata
$sudo pip install requests


upload firmata


>>> import pyfirmata
>>> pin = 13
>>> port = '/dev/cu.usbmodem1411'
>>> board = pyfirmata.Arduino(port)
>>> board.digital[pin].write(1)
>>> board.digital[pin].read()
1
>>> board.digital[pin].write(0)
>>> board.digital[pin].read()
0


1LED_Blink.py


#!/usr/bin/python


import pyfirmata
from time import sleep
pin = 13

port = '/dev/cu.usbmodem1411'
board = pyfirmata.Arduino(port) 
while True:
board.digital[pin].write(1) 
sleep(1)  
board.digital[pin].write(0) 
sleep(1)
board.exit()

Maxde-MacBook-Pro:downloads max$ python 1LED_Blink.py

跳出 Crtl+C
^CTraceback (most recent call last):
  File "1LED_Blink.py", line 11, in <module>
    sleep(1)  
KeyboardInterrupt
Maxde-MacBook-Pro:downloads max$

2console.py

#!/usr/bin/python

import pyfirmata
from time import sleep
pin = 13
port = '/dev/cu.usbmodem1411'
board = pyfirmata.Arduino(port) 
while True:
board.digital[pin].write(1) 
print(board.digital[pin].read()) 
sleep(1)  
board.digital[pin].write(0) 
print(board.digital[pin].read()) //Print out LED status
sleep(1)
board.exit()


^CTraceback (most recent call last):
  File "2console.py", line 14, in <module>
    sleep(1)
KeyboardInterrupt


4helloGUI.py  圖形化介面
#!/usr/bin/python
# -*- coding: UTF-8 -*-

# This code is supporting material for the book
# Python Programming for Arduino
# by Pratik Desai
# published by PACKT Publishing

import Tkinter

# Initialize main windows with title and size
top = Tkinter.Tk()
top.title("Hello GUI")
top.minsize(200, 30)

# Label widget
helloLabel = Tkinter.Label(top,
                           text="Hello World! It is a course這是一個課程")
helloLabel.pack()

# Start and open the window

top.mainloop()

=====7csvWriter.py=====

#!/usr/bin/python
# This code is supporting material for the book
# Python Programming for Arduino
# by Pratik Desai
# published by PACKT Publishing

import csv

data = [[1, 2, 3],['a','b','c'],['Python','for','Arduino']]

with open('PythonforArduino.csv', 'wb') as f:
    w = csv.writer(f)
    for row in data:

        w.writerow(row)


=====7csvReader.py=====


import csv


f = open ('PythonforArduino.csv', 'r')
ll = f.read()
print ll

Run:


Maxde-MacBook-Pro:Downloads max$ python 7csvReader.py 

1,2,3
a,b,c
Python,for,Arduino


=====9plotLive.py=====
顯示電阻Status


2017年11月14日 星期二

Arduino the first time


1. Connect Arduino to MacBook by USB prot
2. Launch Arduino IDE


It will be auto-discovery 

Select connect com port


Pin A0-A5: Analog import
Digital: 0V - 5V?
TX/RX: 外部BT
L: LED pin 13
AT328P chip: 大腦


LED 長腳接+: Pin 13
Load Blink template:


// the setup function runs once when you press reset or power the board
void setup() {
  // initialize digital pin LED_BUILTIN as an output.
  pinMode(13, OUTPUT);
}

// the loop function runs over and over again forever
void loop() {
  digitalWrite(13, HIGH);   // turn the LED on (HIGH is the voltage level)
  delay(200);                       // wait for a second
  digitalWrite(13, LOW);    // turn the LED off by making the voltage LOW
  delay(1000);                       // wait for a second


Practice

// the setup function runs once when you press reset or power the board
void setup() {
  // initialize digital pin LED_BUILTIN as an output.
  pinMode(13, OUTPUT);
  pinMode(12, OUTPUT);
}

// the loop function runs over and over again forever
void loop() {
  digitalWrite(13, HIGH); // turn the LED on (HIGH is the voltage level)
  digitalWrite(12, LOW);  // turn the LED off by making the voltage LOW
  delay(500);             // wait for a second
  digitalWrite(13, LOW);
  digitalWrite(12, HIGH);
  delay(500);             // wait for a second


}

Pracetice: 呼吸燈


int led = 9;           // the PWM pin the LED is attached to Pin 9具備 PWM功能
int brightness = 0;    // how bright the LED is
int fadeAmount = 5;    // how many points to fade the LED by

// the setup routine runs once when you press reset:
void setup() {
  // declare pin 9 to be an output:
  pinMode(led, OUTPUT);
}

// the loop routine runs over and over again forever:
void loop() {
  // set the brightness of pin 9:
  analogWrite(led, brightness);

  // change the brightness for next time through the loop:
  brightness = brightness + fadeAmount;

  // reverse the direction of the fading at the ends of the fade:
  if (brightness <= 0 || brightness >= 255) {
    fadeAmount = -fadeAmount;
  }
  // wait for 30 milliseconds to see the dimming effect
  delay(30);
}

Notes: 0->255 then 255 -> 0 呼吸cycle


Practice:可變電阻


Practice: 感應式互動光源


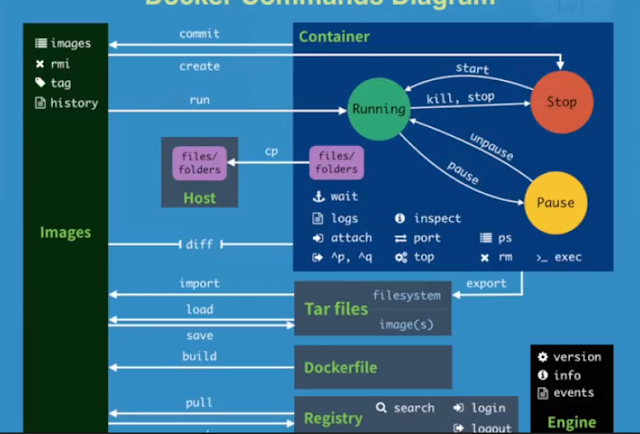
Docker Command

#1 pull images $docker pull chusiang/takaojs1607 #2 list images $docker images #3.1 run docker $docker run -it ### bash #3.2 run do...