max@ubuntu:~$ sudo tcpdump -i ens32 icmp -w packet
-i指定要抓封包的介面
icmp只抓icmp的封包
-w 寫入檔案
Ctrl + C
max@ubuntu:~$ sudo tcpdump -nnXr packet|less
13:57:17.027643 IP 192.168.39.33 > 192.168.88.45: ICMP echo request, id 1, seq 320, length 40
0x0000: 4500 003c 4a56 0000 7f01 f0cb c0a8 2721 E..<JV........'!
0x0010: c0a8 582d 0800 4c1b 0001 0140 6162 6364 ..X-..L....@abcd
0x0020: 6566 6768 696a 6b6c 6d6e 6f70 7172 7374 efghijklmnopqrst
0x0030: 7576 7761 6263 6465 6667 6869 uvwabcdefghi
13:57:17.027694 IP 192.168.88.45 > 192.168.39.33: ICMP echo reply, id 1, seq 320, length 40
0x0000: 4500 003c ed9d 0000 4001 8c84 c0a8 582d E..<....@.....X-
0x0010: c0a8 2721 0000 541b 0001 0140 6162 6364 ..'!..T....@abcd
0x0020: 6566 6768 696a 6b6c 6d6e 6f70 7172 7374 efghijklmnopqrst
0x0030: 7576 7761 6263 6465 6667 6869 uvwabcdefghi
13:57:18.029860 IP 192.168.39.33 > 192.168.88.45: ICMP echo request, id 1, seq 321, length 40
0x0000: 4500 003c 4a57 0000 7f01 f0ca c0a8 2721 E..<JW........'!
0x0010: c0a8 582d 0800 4c1a 0001 0141 6162 6364 ..X-..L....Aabcd
0x0020: 6566 6768 696a 6b6c 6d6e 6f70 7172 7374 efghijklmnopqrst
0x0030: 7576 7761 6263 6465 6667 6869 uvwabcdefghi
13:57:18.029888 IP 192.168.88.45 > 192.168.39.33: ICMP echo reply, id 1, seq 321, length 40
0x0000: 4500 003c ee91 0000 4001 8b90 c0a8 582d E..<....@.....X-
0x0010: c0a8 2721 0000 541a 0001 0141 6162 6364 ..'!..T....Aabcd
0x0020: 6566 6768 696a 6b6c 6d6e 6f70 7172 7374 efghijklmnopqrst
0x0030: 7576 7761 6263 6465 6667 6869 uvwabcdefghi
2019年11月14日 星期四
Linux command egrep
max@ubuntu:~$ ifconfig |egrep "HWadd|inet"
ens32 Link encap:Ethernet HWaddr 00:0c:29:b8:26:8e
inet addr:192.168.88.45 Bcast:192.168.88.255 Mask:255.255.255.0
inet6 addr: fe80::20c:29ff:feb8:268e/64 Scope:Link
inet addr:127.0.0.1 Mask:255.0.0.0
inet6 addr: ::1/128 Scope:Host
max@ubuntu:~$ route |egrep "Dest|168.88"
Destination Gateway Genmask Flags Metric Ref Use Iface
default 192.168.88.1 0.0.0.0 UG 0 0 0 ens32
192.168.88.0 * 255.255.255.0 U 0 0 0 ens32
2019年10月27日 星期日
Ubuntu 16.04/18.04 installation
Ubuntu 在安裝完成時會設DHCP 並自動取得 IP,可透過文字介面來手動設定固定IP。
1.修改 Ethernet 網路設定
root@management:~# vim /etc/network/interfaces
# This file describes the network interfaces available on your system
# and how to activate them. For more information, see interfaces(5).source /etc/network/interfaces.d/*# The loopback network interface
auto lo
iface lo inet loopback# The primary network interface
auto ens160
iface ens160 inet static # 固定 (靜態) IP
address 10.159.xx.xx # IP 位址
netmask 255.255.255.0 # 網路遮罩
gateway 10.159.xx.xx # 預設閘道
dns-nameservers 168.95.1.1 #DNS第一組
dns-nameservers 8.8.8.8 #DNS第二組
2. 修改完可使用以下指令重新啟動網路讀取網路設定
root@management:~# /etc/init.d/networking restart
[ ok ] Restarting networking (via systemctl): networking.service
Add User Ubuntu create user account commands
Let us say you need to add a new user in Ubuntu called vivek, type the following command in your shell:
$ sudo adduser John
Verify
$ cat /etc/passwd
Ubuntu 快速將使用者設成 Sudoer
max@ubuntu:~$ sudo adduser s01224566 sudo
Adding user `s01224566' to group `sudo' ...
Adding user s01224566 to group sudo
Done.
max@ubuntu:~$ sudo cat /etc/group | grep sudo
sudo:x:27:max,sena,gary,s01224566
Ubuntu 18.04 Configuring the network interface
Edit /etc/netplan/00-installer-config.yaml
# This file describes the network interfaces available on your system
# For more information, see netplan(5).
network:
version: 2
renderer: networkd
ethernets:
enp0s3:
dhcp4: yes/no
addresses: [192.168.1.222/24]
gateway4: 192.168.1.1
nameservers:
addresses: [8.8.8.8,8.8.4.4]
$sudo netplan apply
2019年10月1日 星期二
Gitlab 備份筆記
主要指令:
git-server@ubuntu:/opt/gitlab/bin$ gitlab-rake gitlab:backup:create
/usr/bin/gitlab-rake error: could not load /opt/gitlab/etc/gitlab-rails/gitlab-r ails-rc
Either you are not allowed to read the file, or it does not exist yet.
You can generate it with: sudo gitlab-ctl reconfigure
git-server@ubuntu:/opt/gitlab/bin$ sudo gitlab-rake gitlab:backup:create
2019-10-07 15:16:40 +0800 -- Dumping database ...
Dumping PostgreSQL database gitlabhq_production ... [DONE]
2019-10-07 15:16:41 +0800 -- done
2019-10-07 15:16:41 +0800 -- Dumping repositories ...
* yuching/ofco_ching (@hashed/4e/07/4e07408562bedb8b60ce05c1decfe3ad16b72230967 de01f640b7e4729b49fce) ... [SKIPPED]
[SKIPPED] Wiki
* yenpc/my_first_test (@hashed/79/02/7902699be42c8a8e46fbbb4501726517e86b22c56a 189f7625a6da49081b2451) ... [DONE]
[SKIPPED] Wiki
* sapido-iot/egssys (@hashed/3f/db/3fdba35f04dc8c462986c992bcf875546257113072a9 09c162f7e470e581e278) ... [DONE]
[SKIPPED] Wiki
:::
2019-10-07 15:22:23 +0800 -- done
2019-10-07 15:22:23 +0800 -- Dumping lfs objects ...
2019-10-07 15:22:23 +0800 -- done
2019-10-07 15:22:23 +0800 -- Dumping container registry images ...
2019-10-07 15:22:23 +0800 -- [DISABLED]
Creating backup archive: 1570432943_2019_10_07_12.0.3_gitlab_backup.tar ... done
Uploading backup archive to remote storage ... skipped
Deleting tmp directories ... done
done
done
done
done
done
done
done
Deleting old backups ... skipping
Warning: Your gitlab.rb and gitlab-secrets.json files contain sensitive data
and are not included in this backup. You will need these files to restore a backup.
Please back them up manually.
Backup task is done.
有些需要手動備份的檔案
root@ubuntu:/var/opt/gitlab/backups# pwd
/var/opt/gitlab/backups
root@ubuntu:/var/opt/gitlab/backups# ls -al
total 20964304
drwx------ 2 git root 4096 Oct 7 15:24 .
drwxr-xr-x 21 root root 4096 Jul 31 15:14 ..
-rw------- 1 git git 21467432960 Oct 7 15:24 1570432943_2019_10_07_12.0.3_gitlab_backup.tar
備份檔在此
\\192.168.88.16\GitlabBackup
User:backup
Password:R@Sns6
/mnt/nas/GitlabBackupFolder
Edit /etc/gitlab/gitlab.rb
1.gitlab_rails[`backup_path`] 的內容修改成 /mnt/nas/GitlabBackupFolder
/mnt/nas/GitlabBackupFolder/gitlab_backup
2. 仔細看裡面的設定,還可以設定備份的區間,太舊的會自動幫忙刪除。
執行以下指令,讓修改生效
gitlab-ctl reconfigure
gitlab-ctl restart
=======================================================
將NAS的CIFS sharing folder mount 到ubuntu
MOUNT_POINT=/mnt/nas/GitlabBackupFolder
SHARE_FOLDER=//192.168.88.16/GitlabBackup
DOMAIN=NASsrv01
USERNAME=backup
PASSWORD=****
mount -t cifs $SHARE_FOLDER $MOUNT_POINT -o username="$USERNAME",password="$PASSWORD",domain="$DOMAIN",iocharset=utf8,file_mode=0777,dir_mode=0777,vers=2.0
mount -t cifs //192.168.88.16/GitlabBackup /mnt/nas/GitlabBackupFolder -o username="backup",password="******",domain="NASsrv01",iocharset=utf8,file_mode=0777,dir_mode=0777,vers=2.0
mount -t cifs \\192.168.88.16\GitlabBackup /mnt/nas/GitlabBackupFolder -o username=backup,password="******",domain=NASsrv01,iocharset=utf8,file_mode=0777,dir_mode=0777,guest
// 這裡你也可以不用 guest, 可以使用 gid=xxxx 或 uid=xxxx 來指定給某個群組或個人, guest 只是比較偷懶的作法
// 如果遇到失敗可以檢查一下是否有套件沒裝到,再使用 apt-get install 安裝
// apt-get install nfs-common
// apt-get install cifs-utils
mount.cifs \\192.168.88.16\GitlabBackup GitlabBackupFolder -o username=backup
sudo mount -t cifs //192.168.88.16/GitlabBackup /mnt/nas/GitlabBackupFolder
git-server@ubuntu:/mnt/nas$ sudo mount -t cifs $SHARE_FOLDER $MOUNT_POINT -o username="$USERNAME",password="$PASSWORD",domain="$DOMAIN",iocharset=utf8,file_mode=0777,dir_mode=0777,guest,vers=2.0
git-server@ubuntu:/mnt/nas$ ls
GitlabBackupFolder
git-server@ubuntu:/mnt/nas$ cd GitlabBackupFolder/
git-server@ubuntu:/mnt/nas/GitlabBackupFolder$ ls
'#recycle' test.txt
git-server@ubuntu:/mnt/nas/GitlabBackupFolder$
https://www.rootop.org/pages/4165.html
ubuntu挂载共享mount error(95): Operation not supported
gitlab_rails['manage_backup_path'] = true
gitlab_rails['backup_path'] = "/mnt/nas/GitlabBackupFolder"
Ran chmod 00700 returned 1
Ran chmod 00700 returned 1
chmod 00700 /mnt/nas/GitlabBackupFolder
STDERR: chmod: changing permissions of '': Operation not permitted
=======================================================
Cron Job 排程
sudo crontab -e
## Gitlab Backup
# Launch Gitlab backup service
0 2 * * * /opt/gitlab/bin/gitlab-rake gitlab:backup:create
# Copy Gitlab backup file to remote server
0 3 * * * find /var/opt/gitlab/backups/ -name "*gitlab_backup.tar" -mtime -1 -exec /bin/cp -a {} /mnt/nas/GitlabBackupFolder \;
# Retain backup data on local folder in 3 days
0 4 * * * find /var/opt/gitlab/backups/ -name "*gitlab_backup.tar" -mtime +1 -exec rm -rf {} \;
# Retain backup data on local folder in 7 days
0 5 * * * find /mnt/nas/GitlabBackupFolder/ -name "*gitlab_backup.tar" -mtime +7 -exec rm -rf {} \;
成功
=======================================================
find /var/opt/gitlab/backups/ -name "*gitlab_backup.tar" -mtime +1
find /mnt/nas/GitlabBackupFolder/ -name "*gitlab_backup.tar" -mtime +7 -exec rm -rf {} \;
要還原時主要步驟:
先安裝與之前備份時相同版本的 Gitlab
停止 gitlab 的服務
將要還原的備份檔放到 /var/opt/gitlab/backups/ 位置
下指令指定要還原的 TIME_STAMP 備份檔
啟動 gitlab, Create satellites, Check gitlab ... 完成
https://poychang.github.io/gitlab-backup/
Gitlab 備份筆記
http://mycodetub.logdown.com/posts/260395-gitlab-backup-restore-settings-notes
Gitlab 備份/還原設定筆記
Gitlab備份與恢復、遷移與升級
https://www.itread01.com/content/1527863887.html
mkdir -p /mnt/nas/GitlabBackupFolder2
mount -t nfs 192.168.88.16:/volume1/GitlabBackup2 /mnt/nas/GitlabBackupFolder2
mount: can't find in /etc/fstab.
2019年3月29日 星期五
Graylog Installation Record
[aws-pls-mongo1b] Shell record
$mkdir mongo
$sudo vi /etc/yum.repos.d/mongodb-org-3.6.repo file
[mongodb-org-3.6]
name=MongoDB Repository
baseurl=https://repo.mongodb.org/yum/amazon/2013.03/mongodb-org/3.6/x86_64/
gpgcheck=1
enabled=1
gpgkey=https://www.mongodb.org/static/pgp/server-3.6.asc
$sudo yum install -y mongodb-org
<ulimit settings for mongo>
$ sudo su
ulimit -f unlimited
ulimit -t unlimited
ulimit -v unlimited
ulimit -l unlimited
ulimit -n 64000
ulimit -m unlimited
<Verify>
ulimit -u 64000
reboot now
ulimit -a
$sudo service mongod status
$sudo service mongod start
$sudo service mongod status
$sudo chkconfig mongod on
$sudo vi /etc/mongod.conf
# network interfaces
net:
port: 27017
bindIp: 0.0.0.0 # Listen to local interface only, comment to listen on all interfaces.
$sudo service mongod stop
$sudo service mongod start
$sudo service mongod status
# Verification and Passed
$ mongo --host 10.104.187.162:27017
mongo --host LB-PLS-BETA-MONGO-INT-77e51851111d7088.elb.us-west-2.amazonaws.com:27017
================================================
[aws-pls-elastic1b] Shell record
$ sudo yum install -y java
$ sudo rpm --import https://artifacts.elastic.co/GPG-KEY-elasticsearch
$ wget https://artifacts.elastic.co/downloads/elasticsearch/elasticsearch-6.5.4.rpm
$ sudo rpm --install elasticsearch-6.5.4.rpm
$ sudo systemctl start elasticsearch.service
$ sudo systemctl status elasticsearch.service
$ sudo vi /etc/elasticsearch/elasticsearch.yml
network.host: 0.0.0.0
http.port: 9200
$ sudo vi /etc/elasticsearch/jvm.options
-Xms4g
-Xmx4g
$ sudo systemctl restart elasticsearch.service
$ sudo systemctl status elasticsearch.service
# Verification and Passed
$ sudo curl "http://127.0.0.1:9200/_cat/nodes"
$ sudo curl "http://localhost:9200/_cat/nodes"
$ sudo curl "http://10.104.187.148:9200/_cat/nodes"
$ sudo curl -XGET 'http://localhost:9200/_cluster/health?pretty=true’
$ sudo curl -XGET 'http://127.0.0.1:9200/_cluster/health?pretty=true’
$ sudo curl -XGET "http://10.104.187.148:9200/_cluster/health?pretty=true"
[ec2-user@ip-10-104-187-162 ~]$ sudo curl "http://10.104.187.148:9200/_cat/nodes"
10.104.187.148 4 66 0 0.10 0.12 0.05 mdi * 4wlbKCJ
[ec2-user@ip-10-104-187-145 ~]$ sudo curl "http://10.104.187.148:9200/_cat/nodes"
10.104.187.148 3 67 1 0.02 0.05 0.01 mdi * 4wlbKCJ
[ec2-user@ip-10-104-187-145 ~]$ sudo curl "http://LB-PLS-BETA-ES-INT-78477d32e333724d.elb.us-west-2.amazonaws.com:9200/_cat/nodes"
10.104.187.148 3 67 1 0.02 0.05 0.01 mdi * 4wlbKCJ
[ec2-user@ip-10-104-187-145 ~]$ sudo curl "http://LB-PLS-BETA-ES-INT-78477d32e333724d.elb.us-west-2.amazonaws.com:9200/_cat/nodes"
10.104.187.148 5 67 0 0.00 0.00 0.00 mdi * 4wlbKCJ
sudo curl -XGET "http://LB-PLS-BETA-ES-INT-78477d32e333724d.elb.us-west-2.amazonaws.com:9200/_cluster/health?pretty=true"
================================================
<Passed>
telnet 10.104.187.148 9200
telnet 10.104.187.162 27017
<Passed>
LB-PLS-BETA-ES-INT-78477d32e333724d.elb.us-west-2.amazonaws.com
LB-PLS-BETA-MONGO-INT-77e51851111d7088.elb.us-west-2.amazonaws.com
telnet LB-PLS-BETA-ES-INT-78477d32e333724d.elb.us-west-2.amazonaws.com 9200
telnet LB-PLS-BETA-MONGO-INT-77e51851111d7088.elb.us-west-2.amazonaws.com 27017
sudo curl -XGET "http://LB-PLS-BETA-ES-INT-78477d32e333724d.elb.us-west-2.amazonaws.com:9200/_cluster/health?pretty=true"
[aws-pls-graylog1b] Shell record
$ sudo yum update
$ sudo yum install -y java
$ wget https://packages.graylog2.org/releases/graylog/graylog-2.5.1.tgz
https://packages.graylog2.org/releases/graylog/graylog-2.5.1.tgz
https://packages.graylog2.org/repo/packages/graylog-2.5-repository_latest.rpm
https://packages.graylog2.org/repo/packages/graylog-2.5-repository_latest.rpm
$ tar xvfz graylog-2.5.1.tgz
$ sudo mkdir /etc/graylog
$ sudo mkdir /etc/graylog/server/
$ sudo cp ~/graylog-2.5.1/graylog.conf.example /etc/graylog/server/server.conf
$ sudo vi /etc/graylog/server/server.conf
<1>*
password_secret = sKzW2vDDkqOQTrKC
root_password_sha2 = 8c6976e5b5410415bde908bd4dee15dfb167a9c873fc4bb8a81f6f2ab448a918
elasticsearch_shards = 1
elasticsearch_hosts = http://LB-PLS-BETA-ES-INT-78477d32e333724d.elb.us-west-2.amazonaws.com:9200
mongodb_uri = mongodb://LB-PLS-BETA-MONGO-INT-77e51851111d7088.elb.us-west-2.amazonaws.com/graylog
rest_listen_uri = http://10.104.187.145:9000/api/
web_listen_uri = http://10.104.187.145:9000/
=>
rest_listen_uri = http://0.0.0.0:9000/api/
web_listen_uri = http://0.0.0.0:9000/
telnet 10.104.187.148 9200
telnet 10.104.187.162 27017
<2>
password_secret = sKzW2vDDkqOQTrKC
root_password_sha2 = 8c6976e5b5410415bde908bd4dee15dfb167a9c873fc4bb8a81f6f2ab448a918
elasticsearch_shards = 4
elasticsearch_hosts = http://10.104.187.148:9200
mongodb_uri = mongodb://10.104.187.162/graylog
rest_listen_uri = http://10.104.187.145:9000/api/
===================================================================
Configure at least the following variables in /etc/graylog/server/server.conf:
***
# List of Elasticsearch hosts Graylog should connect to.
# Need to be specified as a comma-separated list of valid URIs for the http ports of your elasticsearch nodes.
# If one or more of your elasticsearch hosts require authentication, include the credentials in each node URI that
# requires authentication.
#
# Default: http://127.0.0.1:9200
#elasticsearch_hosts = http://node1:9200,http://user:password@node2:19200
# MongoDB connection string
# See https://docs.mongodb.com/manual/reference/connection-string/ for details
<add>
mongodb_uri = mongodb://LB-PLS-BETA-MONGO-INT-77e51851111d7088.elb.us-west-2.amazonaws.com/graylog
# Authenticate against the MongoDB server
#mongodb_uri = mongodb://grayloguser:secret@localhost:27017/graylog
# Use a replica set instead of a single host
#mongodb_uri = mongodb://grayloguser:secret@localhost:27017,localhost:27018,localhost:27019/graylog
***
root_password_sha2 = 8c6976e5b5410415bde908bd4dee15dfb167a9c873fc4bb8a81f6f2ab448a918
elasticsearch_shards = 1
elasticsearch_hosts = http://LB-PLS-BETA-ES-INT-78477d32e333724d.elb.us-west-2.amazonaws.com:9200
mongodb_uri = mongodb://LB-PLS-BETA-MONGO-INT-77e51851111d7088.elb.us-west-2.amazonaws.com/graylog
#New ES
elasticsearch_hosts = https://vpc-pls-log-nonprod-jql2okbojnqn5npwbkbo5qjsgy.us-west-2.es.amazonaws.com
[ec2-user@ip-10-104-187-145 ~]$ echo -n "Enter Password: " && head -1 </dev/stdin | tr -d '\n' | sha256sum | cut -d" " -f1
Enter Password: admin
8c6976e5b5410415bde908bd4dee15dfb167a9c873fc4bb8a81f6f2ab448a918
===================================================================
Starting the server
$ sudo ./bin/graylogctl start
Starting graylog-server ...
$ sudo ./bin/graylogctl status
graylog-server running with PID 4175
$ sudo ./bin/graylogctl stop
Stopping graylog-server (4175) ...
Waiting for graylog-server to halt.
graylog-server stopped
$ tail ./log/graylog-server.log
Verification
http://10.104.187.145:9000
http://lb-pls-beta-graylog-int-51246890d683260e.elb.us-west-2.amazonaws.com:9000/gettingstarted
echo `date` | nc 10.104.187.145 12201
echo `date` | nc graylog-test.bapls.net 12201
http://graylog-test.bapls.net:9000
graylog-test.bapls.net
===========================================================
Sending in log data
http://docs.graylog.org/en/2.5/pages/sending_data.html
**Sending GELF messages via HTTP using curl
curl -XPOST http://10.104.187.145:12202/gelf -p0 -d '{"short_message":"Hello there IP0124", "host":"tw-pls-ta-dock", "facility":"test", "_foo":"bar"}'
curl -XPOST http://graylog-test.bapls.net:12202/gelf -p0 -d '{"short_message":"Hello there FQDN0124", "host":"tw-pls-ta-dock", "facility":"test", "_foo":"bar"}'
curl -XPOST http://LB-PLS-BETA-GRAYLOG-INT-51246890d683260e.elb.us-west-2.amazonaws.com:12202/gelf -p0 -d '{"short_message":"Hello there FQDN0124", "host":"tw-pls-ta-dock", "facility":"test", "_foo":"bar"}'
**Sending GELF messages via TCP using netcat
echo -n -e '{ "version": "1.1", "host": "tw-pls-ta-dock2", "short_message": "A short message by IP0124", "level": 5, "_some_info": "foo" }'"\0" | nc -w0 10.104.187.145 12201
echo -n -e '{ "version": "1.1", "host": "tw-pls-ta-dock2", "short_message": "A short message by FQDN0124", "level": 5, "_some_info": "foo" }'"\0" | nc -w0 graylog-test.bapls.net 12201
echo -n -e '{ "version": "1.1", "host": "tw-pls-ta-dock2", "short_message": "A short message by FQDN0124", "level": 5, "_some_info": "foo" }'"\0" | nc -w0 LB-PLS-BETA-GRAYLOG-INT-51246890d683260e.elb.us-west-2.amazonaws.com 12201
FQDN seems not works stable??
Testing Telnet 12201 port
max@tw-pls-ta-dock2:~$ telnet 10.104.187.145 12201
Trying 10.104.187.145...
Connected to 10.104.187.145.
Escape character is '^]'.
max@tw-pls-ta-dock2:~$ telnet graylog-test.bapls.net 12201
Trying 10.104.187.171...
Connected to lb-pls-beta-graylog-int-51246890d683260e.elb.us-west-2.amazonaws.com.
Escape character is '^]'.
Test curl http post
max@tw-pls-ta-dock2:~$ curl -XPOST http://10.104.187.145:12202/gelf -p0 -d '{"short_message":"Hello there IP1", "host":"example.org", "facility":"test", "_foo":"bar"}'
max@tw-pls-ta-dock2:~$ curl -XPOST http://graylog-test.bapls.net:12202/gelf -p0 -d '{"short_message":"Hello there FQDN1", "host":"example.org", "facility":"test", "_foo":"bar"}'
curl -XPOST http://graylog-test.bapls.net:12202/gelf -p0 -d '{"short_message":"Hello there FQDN1", "host":"example.org", "facility":"test", "_foo":"bar"}'
curl -X POST -u "ext_maxm:03e1ef098a609c3718cd3e10322a3acf" -H "Jenkins-Crumb:a32e3694b05057ca7942ae3d8d692693" http://tw-pls-jenk1.client.tw.trendnet.org:8080/view/Operation/view/2_Stage/job/DRI_PVT_STG_aws-pls-dris1s/buildWithParameters?token=thisismysecret&cause=trigger+by+shavlik+POC
Invoke-RestMethod -Uri http://graylog-test.bapls.net:12202/gelf -Method POST '{"short_message":"Hello there FQDN1", "host":"example.org", "facility":"test", "_foo":"bar"}'
Invoke-RestMethod -Uri http://10.104.187.145:12202/gelf -Method GET
$Url = "http://graylog-test.bapls.net:9000"
Invoke-RestMethod -Uri $url -Method Get
Test curl http
curl http://10.104.187.145:12202
<No Message Retured>
curl http://graylog-test.bapls.net:9000
<Some Retured>
==========================================
curl -o certificaterequest.csv --user certreport:Cert#Report9 'http://siteaddress/Reports/CertificateReport?starttime=2014-02-01T00:00:00&endtime=2014-05-01T00:00:00'
$cred = Get-Credential #will prompt you to enter userame and password
$csv="d:\output.csv"
$url="url"
Invoke-RestMethod -Uri $url -OutFile $csv -Credential $cred
curl -XPOST http://10.104.187.145:12202/gelf -p0 -d '{"short_message":"Hello there IP1", "host":"example.org", "facility":"test", "_foo":"bar"}'
echo -n -e '{ "version": "1.1", "host": "example.orgIP", "short_message": "A short message", "level": 5, "_some_info": "foo" }'"\0" | nc -w0 10.104.187.145 12201
$Url = "http://10.104.187.145:9000"
Invoke-RestMethod -Uri $url -Method Get
$Url = "http://10.104.187.145:12202"
$body= "Test"
Invoke-RestMethod -Uri $url -Method Post -Body $body -ContentType 'application/json' -Headers $hdrs
2019年2月24日 星期日
delete all lines in vi vim
To delete all lines in vim, use this command:
:1,$d
This vim “delete all lines” command can be read like this:
The : character starts vim’s “last line mode.”
The 1 means, “starting at line 1”
The ,$ means, “until the end of the file”
The d means, “delete”
:1,$d
This vim “delete all lines” command can be read like this:
The : character starts vim’s “last line mode.”
The 1 means, “starting at line 1”
The ,$ means, “until the end of the file”
The d means, “delete”
2019年2月20日 星期三
2018年7月12日 星期四
dig host nslookup command in Linux
dig:
dig @NameServer 網域名稱 Type
host:
host -t Type 網域名稱 NameServer
nslookup:
nslookup -type=Type 網域名稱 NameServer
其中 Type 的參數有
$ dig @ns1.google.com www.google.com # 指定 NS1 的 dns server
$ dig google.com @8.8.4.4 # 指定 dns server (結果省略, 請自行測試)
$ dig +trace google.com # 追蹤看經過哪些節點 (結果省略, 請自行測試)
$ dig +trace google.com @8.8.8.8 # 指定 dns server + 追蹤路徑經過 (結果省略, 請自行測試)
CentOS 6 without dig command by default
#yum install bind-utils
:::
Installing : 32:bind-libs-9.8.2-0.68.rc1.el6.x86_64 1/2
Installing : 32:bind-utils-9.8.2-0.68.rc1.el6.x86_64 2/2
Verifying : 32:bind-libs-9.8.2-0.68.rc1.el6.x86_64 1/2
Verifying : 32:bind-utils-9.8.2-0.68.rc1.el6.x86_64 2/2
dig @NameServer 網域名稱 Type
host:
host -t Type 網域名稱 NameServer
nslookup:
nslookup -type=Type 網域名稱 NameServer
其中 Type 的參數有
- any
- a: 查 IP Address
- mx: 查郵件伺服器
- ns: 查名稱伺服器
- cname: 查別名
- ptr: 由 IP Address 反查網域名稱
- hinfo: 查伺服器的系統資訊
$ dig @ns1.google.com www.google.com # 指定 NS1 的 dns server
$ dig google.com @8.8.4.4 # 指定 dns server (結果省略, 請自行測試)
$ dig +trace google.com # 追蹤看經過哪些節點 (結果省略, 請自行測試)
$ dig +trace google.com @8.8.8.8 # 指定 dns server + 追蹤路徑經過 (結果省略, 請自行測試)
CentOS 6 without dig command by default
#yum install bind-utils
:::
Installing : 32:bind-libs-9.8.2-0.68.rc1.el6.x86_64 1/2
Installing : 32:bind-utils-9.8.2-0.68.rc1.el6.x86_64 2/2
Verifying : 32:bind-libs-9.8.2-0.68.rc1.el6.x86_64 1/2
Verifying : 32:bind-utils-9.8.2-0.68.rc1.el6.x86_64 2/2
#host www.pchome.com.tw
www.pchome.com.tw has address 220.130.119.180
# dig www.pchome.com.tw
; <<>> DiG 9.8.2rc1-RedHat-9.8.2-0.68.rc1.el6 <<>> www.pchome.com.tw
;; global options: +cmd
;; Got answer:
;; ->>HEADER<<- opcode: QUERY, status: NOERROR, id: 10971
;; flags: qr rd ra; QUERY: 1, ANSWER: 1, AUTHORITY: 0, ADDITIONAL: 0
;; QUESTION SECTION:
;www.pchome.com.tw. IN A
;; ANSWER SECTION:
www.pchome.com.tw. 68 IN A 220.130.119.180
;; Query time: 0 msec
;; SERVER: 10.1.107.40#53(10.1.107.40)
;; WHEN: Thu Jul 5 12:37:33 2018
;; MSG SIZE rcvd: 51
# nslookup www.pchome.com.tw
Server: 10.1.107.40
Address: 10.1.107.40#53
Name: www.pchome.com.tw
Address: 220.130.119.180
2018年7月4日 星期三
Linux DNS 解析問題
用戶端重試
DNS 主要是 UDP 通訊協定。 因為 UDP 通訊協定並不保證訊息傳遞,所以 DNS 通訊協定本身會處理重試邏輯。 每個 DNS 用戶端 (作業系統) 可以展現不同的重試邏輯,根據建立者喜好設定而定:
Windows 作業系統會在 1 秒後重試,然後再依序隔 2、4、4 秒後重試。
預設 Linux 安裝程式會在 5 秒之後重試。 您應該將此變更為以 1 秒的間隔重試 5 次。
檢查 Linux 虛擬機器上目前的設定 'cat /etc/resolv.conf',並查看 'options' 行,例如:
options timeout:1 attempts:5
/etc/sysconfig/network
RES_OPTIONS="rotate timeout:1 attempts:1"
resolv.conf 檔案會自動產生且不可編輯。 新增 [選項] 行的特定步驟會因發行版本而有所不同:
為了達到最佳效能,當您在 Azure DNS 伺服器中使用虛擬機器時,請停用 IPv6,並將執行個體層級公用 IP 指派給每部 DNS 伺服器虛擬機器。
Azure 中 Linux 虛擬機器的 DNS 名稱解析選項
2018年4月17日 星期二
CentOS 7 Installation, SSH Enablement, Proxy Setting
1. OS installation

2. Proxy Setting
在一般公司的環境下Client端都需要設定Proxy才可以對外連線
假設Proxy的IP:192.168.1.10 , port:8080
編輯 .bash_profile (root目錄下) ,新增以下(紅字):
http_proxy=192.168.1.10:8080
ftp_proxy=192.168.1.10:8080
export http_proxy
export ftp_proxy
執行
[root@Server ~]# source .bash_profile
看看是否設定成功
[root@Server ~]# echo $http_proxy
192.168.1.10:8080
- 針對所有使用者
如果要讓這台主機的所有 http / https 都走 proxy 就設定在 /etc/profile
2.1 For Yum proxy setting
/etc/yum.conf
add line proxy=http://192.160.1.1:8080
$ vim /etc/apt/apt.conf
Acquire::http::Proxy "http://proxy.example.com";
2.2 Docker Hub Proxy setting [Refer]
mkdir /etc/systemd/system/docker.service.d
vim /etc/systemd/system/docker.service.d/http-proxy.conf
[Service]
Environment="HTTP_PROXY=http://10.1.107.222:8080"
systemctl daemon-reload
systemctl show --property Environment docker
設定永久變數
- 僅在目前使用者
永久變數可以寫在登入後會讀取的 ~/.bash_profile , ~/.bashrc
- 針對所有使用者
如果要讓這台主機的所有 http / https 都走 proxy 就設定在 /etc/profile
- 僅 apt or yum 使用時才用 proxy
3. Yum install OpenSSH server
$ sudo yum install openssh openssh-server

4. Edit /etc/ssh/sshd_config
Port 22 -> xxx
PermitRootLogin no
Protocol 2
sudo systemctl restart sshd.service
sudo systemctl enable sshd.service
sudo systemctl status sshd.service
5. Config Firewall
SELinux disable
Check Firewall already disabled
#getenforce
If Firewall not show disabled, please modify the file.
#vi /etc/sysconfig/selinux
SELINUX=disabled
(Need to reboot)
# firewall-cmd --permanent --add-port=200-300/tcp
success
# firewall-cmd --reload
successls
CentOS7 Firewall refer:
https://www.rootusers.com/how-to-open-a-port-in-centos-7-with-firewalld/
http://blog.xuite.net/tolarku/blog/363801991-CentOS+7+Firewalld+%E9%98%B2%E7%81%AB%E7%89%86%E8%AA%AA%E6%98%8E%E4%BB%8B%E7%B4%B9
6. Add new user
#Add user for DEV or QA
useradd John
passwd John
#chmod 660 /etc/sudoers
Add user into sudoer to get root permission
#vi /etc/sudoers
John ALL=(ALL) ALL
Refer:
https://www.brilliantcode.net/124/centos-7-install-and-configure-ssh/
CentOS 7 default No semanage command, need to install
http://n.sfs.tw/content/index/11039
https://www.brilliantcode.net/124/centos-7-install-and-configure-ssh/
CentOS 7 default No semanage command, need to install
http://n.sfs.tw/content/index/11039
訂閱:
文章 (Atom)
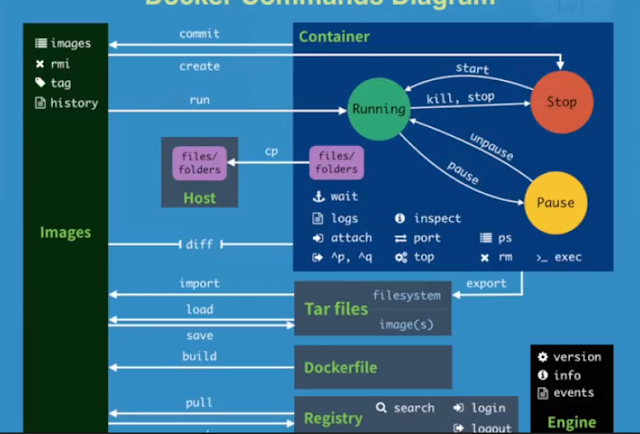
Docker Command
#1 pull images $docker pull chusiang/takaojs1607 #2 list images $docker images #3.1 run docker $docker run -it ### bash #3.2 run do...