顯示具有 DNS 標籤的文章。 顯示所有文章

2018年7月12日 星期四

dig host nslookup command in Linux

dig:
dig @NameServer 網域名稱 Type

host:
host -t Type 網域名稱 NameServer

nslookup:
nslookup -type=Type 網域名稱 NameServer

其中 Type 的參數有


  1. any
  2. a: 查 IP Address
  3. mx: 查郵件伺服器
  4. ns: 查名稱伺服器
  5. cname: 查別名
  6. ptr: 由 IP Address 反查網域名稱
  7. hinfo: 查伺服器的系統資訊

$ dig @ns1.google.com www.google.com # 指定 NS1 的 dns server
$ dig google.com @8.8.4.4 # 指定 dns server (結果省略, 請自行測試)
$ dig +trace google.com # 追蹤看經過哪些節點 (結果省略, 請自行測試)
$ dig +trace google.com @8.8.8.8 # 指定 dns server + 追蹤路徑經過 (結果省略, 請自行測試)

CentOS 6 without dig command by default

#yum install bind-utils

:::

  Installing : 32:bind-libs-9.8.2-0.68.rc1.el6.x86_64                       1/2
  Installing : 32:bind-utils-9.8.2-0.68.rc1.el6.x86_64                      2/2
  Verifying  : 32:bind-libs-9.8.2-0.68.rc1.el6.x86_64                       1/2
  Verifying  : 32:bind-utils-9.8.2-0.68.rc1.el6.x86_64                      2/2

#host www.pchome.com.tw
www.pchome.com.tw has address 220.130.119.180

# dig www.pchome.com.tw

; <<>> DiG 9.8.2rc1-RedHat-9.8.2-0.68.rc1.el6 <<>> www.pchome.com.tw
;; global options: +cmd
;; Got answer:
;; ->>HEADER<<- opcode: QUERY, status: NOERROR, id: 10971
;; flags: qr rd ra; QUERY: 1, ANSWER: 1, AUTHORITY: 0, ADDITIONAL: 0

;; QUESTION SECTION:
;www.pchome.com.tw.             IN      A

;; ANSWER SECTION:
www.pchome.com.tw.      68      IN      A       220.130.119.180

;; Query time: 0 msec
;; SERVER: 10.1.107.40#53(10.1.107.40)
;; WHEN: Thu Jul  5 12:37:33 2018
;; MSG SIZE  rcvd: 51

# nslookup www.pchome.com.tw
Server:         10.1.107.40
Address:        10.1.107.40#53

Name:   www.pchome.com.tw
Address: 220.130.119.180


2018年7月4日 星期三

Linux DNS 解析問題


用戶端重試
DNS 主要是 UDP 通訊協定。 因為 UDP 通訊協定並不保證訊息傳遞,所以 DNS 通訊協定本身會處理重試邏輯。 每個 DNS 用戶端 (作業系統) 可以展現不同的重試邏輯,根據建立者喜好設定而定:
Windows 作業系統會在 1 秒後重試,然後再依序隔 2、4、4 秒後重試。
預設 Linux 安裝程式會在 5 秒之後重試。 您應該將此變更為以 1 秒的間隔重試 5 次。
檢查 Linux 虛擬機器上目前的設定 'cat /etc/resolv.conf',並查看 'options' 行,例如:


options timeout:1 attempts:5

/etc/sysconfig/network

RES_OPTIONS="rotate timeout:1 attempts:1"

resolv.conf 檔案會自動產生且不可編輯。 新增 [選項] 行的特定步驟會因發行版本而有所不同:


為了達到最佳效能,當您在 Azure DNS 伺服器中使用虛擬機器時,請停用 IPv6,並將執行個體層級公用 IP 指派給每部 DNS 伺服器虛擬機器。


Azure 中 Linux 虛擬機器的 DNS 名稱解析選項

2017年12月21日 星期四

How to flush DNS cache in Linux / Windows / Mac

Flush dns to get a new name resolution. Also flush dns cache when you can’t access a newly registered domain name. You can simply flush your dns cache anytime to get new entry. So, Flush your dns cache now.

To flush DNS cache in Microsoft Windows (Win XP, Win ME, Win 2000):
– Start -> Run -> type cmd
 – in command prompt, type ipconfig /flushdns
 – Done! You Window DNS cache has just been flush.

To flush the DNS cache in Linux, restart the nscd daemon:
 – To restart the nscd daemon, type /etc/rc.d/init.d/nscd restart in your terminal
 – Once you run the command your linux DNS cache will flush.

To flush the DNS cache in Mac OS X Leopard:
– type lookupd -flushcache in your terminal to flush the DNS resolver cache.
 ex: bash-2.05a$ lookupd -flushcache
 – Once you run the command your DNS cache (in Mac OS X) will flush.

To flush the DNS cache in Mac OS X:-

– type dscacheutil -flushcache in your terminal to flush the DNS resolver cache.
 ex: bash-2.05a$ dscacheutil -flushcache
 – Once you run the command your DNS cache (in Mac OS X Leopard) will flush.


2017年11月21日 星期二

Differences between the A, CNAME, ALIAS and URL records

Differences between the A, CNAME, ALIAS and URL records

    The A record maps a name to one or more IP addresses, when the IP are known and stable. IP已知且穩定時,A記錄將名稱映射到一個或多個IP地址
    The CNAME record maps a name to another name. It should only be used when there are no other records on that name. CNAME記錄將名稱映射到另一個名稱。 只有在沒有其他記錄的情況下才能使用。
    The ALIAS record maps a name to another name, but in turns it can coexist with other records on that name. ALIAS記錄將名稱映射到另一個名稱,但是它可以與該名稱上的其他記錄共存。
    The URL record redirects the name to the target name using the HTTP 301 status code.

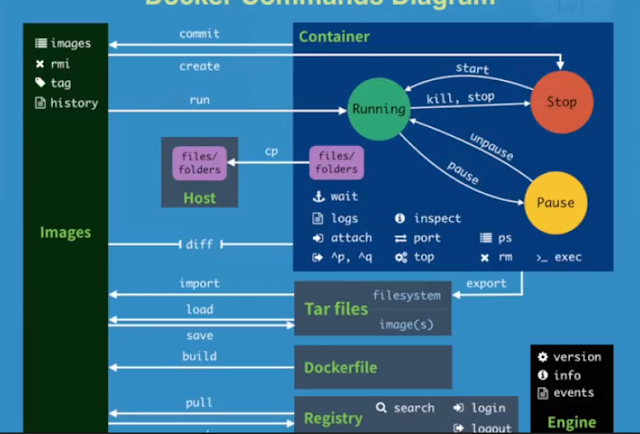
Docker Command

#1 pull images $docker pull chusiang/takaojs1607 #2 list images $docker images #3.1 run docker $docker run -it ### bash #3.2 run do...