2019年10月1日 星期二

Gitlab 備份筆記


主要指令:
git-server@ubuntu:/opt/gitlab/bin$ gitlab-rake gitlab:backup:create
/usr/bin/gitlab-rake error: could not load /opt/gitlab/etc/gitlab-rails/gitlab-r                                                                                               ails-rc
Either you are not allowed to read the file, or it does not exist yet.
You can generate it with:   sudo gitlab-ctl reconfigure
git-server@ubuntu:/opt/gitlab/bin$ sudo gitlab-rake gitlab:backup:create
2019-10-07 15:16:40 +0800 -- Dumping database ...
Dumping PostgreSQL database gitlabhq_production ... [DONE]
2019-10-07 15:16:41 +0800 -- done
2019-10-07 15:16:41 +0800 -- Dumping repositories ...
 * yuching/ofco_ching (@hashed/4e/07/4e07408562bedb8b60ce05c1decfe3ad16b72230967                                                                                               de01f640b7e4729b49fce) ... [SKIPPED]
[SKIPPED] Wiki
 * yenpc/my_first_test (@hashed/79/02/7902699be42c8a8e46fbbb4501726517e86b22c56a                                                                                               189f7625a6da49081b2451) ... [DONE]
[SKIPPED] Wiki
 * sapido-iot/egssys (@hashed/3f/db/3fdba35f04dc8c462986c992bcf875546257113072a9                                                                                               09c162f7e470e581e278) ... [DONE]
[SKIPPED] Wiki

:::

2019-10-07 15:22:23 +0800 -- done
2019-10-07 15:22:23 +0800 -- Dumping lfs objects ...
2019-10-07 15:22:23 +0800 -- done
2019-10-07 15:22:23 +0800 -- Dumping container registry images ...
2019-10-07 15:22:23 +0800 -- [DISABLED]
Creating backup archive: 1570432943_2019_10_07_12.0.3_gitlab_backup.tar ... done
Uploading backup archive to remote storage  ... skipped
Deleting tmp directories ... done
done
done
done
done
done
done
done
Deleting old backups ... skipping
Warning: Your gitlab.rb and gitlab-secrets.json files contain sensitive data
and are not included in this backup. You will need these files to restore a backup.
Please back them up manually.
Backup task is done.
有些需要手動備份的檔案

root@ubuntu:/var/opt/gitlab/backups# pwd
/var/opt/gitlab/backups

root@ubuntu:/var/opt/gitlab/backups# ls -al
total 20964304
drwx------  2 git  root        4096 Oct  7 15:24 .
drwxr-xr-x 21 root root        4096 Jul 31 15:14 ..
-rw-------  1 git  git  21467432960 Oct  7 15:24 1570432943_2019_10_07_12.0.3_gitlab_backup.tar
備份檔在此

\\192.168.88.16\GitlabBackup
User:backup
Password:R@Sns6
/mnt/nas/GitlabBackupFolder

Edit /etc/gitlab/gitlab.rb
1.gitlab_rails[`backup_path`] 的內容修改成 /mnt/nas/GitlabBackupFolder

/mnt/nas/GitlabBackupFolder/gitlab_backup

2. 仔細看裡面的設定,還可以設定備份的區間,太舊的會自動幫忙刪除。

執行以下指令,讓修改生效
gitlab-ctl reconfigure
gitlab-ctl restart

=======================================================
將NAS的CIFS sharing folder mount 到ubuntu
MOUNT_POINT=/mnt/nas/GitlabBackupFolder
SHARE_FOLDER=//192.168.88.16/GitlabBackup
DOMAIN=NASsrv01
USERNAME=backup
PASSWORD=****

mount -t cifs $SHARE_FOLDER $MOUNT_POINT -o username="$USERNAME",password="$PASSWORD",domain="$DOMAIN",iocharset=utf8,file_mode=0777,dir_mode=0777,vers=2.0

mount -t cifs //192.168.88.16/GitlabBackup /mnt/nas/GitlabBackupFolder -o username="backup",password="******",domain="NASsrv01",iocharset=utf8,file_mode=0777,dir_mode=0777,vers=2.0

mount -t cifs \\192.168.88.16\GitlabBackup /mnt/nas/GitlabBackupFolder -o username=backup,password="******",domain=NASsrv01,iocharset=utf8,file_mode=0777,dir_mode=0777,guest

// 這裡你也可以不用 guest, 可以使用 gid=xxxx 或 uid=xxxx 來指定給某個群組或個人, guest 只是比較偷懶的作法
// 如果遇到失敗可以檢查一下是否有套件沒裝到,再使用 apt-get install 安裝
// apt-get install nfs-common
// apt-get install cifs-utils

mount.cifs \\192.168.88.16\GitlabBackup GitlabBackupFolder -o username=backup

sudo mount -t cifs //192.168.88.16/GitlabBackup /mnt/nas/GitlabBackupFolder

git-server@ubuntu:/mnt/nas$ sudo mount -t cifs $SHARE_FOLDER $MOUNT_POINT -o username="$USERNAME",password="$PASSWORD",domain="$DOMAIN",iocharset=utf8,file_mode=0777,dir_mode=0777,guest,vers=2.0
git-server@ubuntu:/mnt/nas$ ls
GitlabBackupFolder
git-server@ubuntu:/mnt/nas$ cd GitlabBackupFolder/
git-server@ubuntu:/mnt/nas/GitlabBackupFolder$ ls
'#recycle'   test.txt
git-server@ubuntu:/mnt/nas/GitlabBackupFolder$

https://www.rootop.org/pages/4165.html
ubuntu挂载共享mount error(95): Operation not supported


 gitlab_rails['manage_backup_path'] = true
 gitlab_rails['backup_path'] = "/mnt/nas/GitlabBackupFolder"


Ran chmod 00700  returned 1
chmod 00700 /mnt/nas/GitlabBackupFolder


STDERR: chmod: changing permissions of '': Operation not permitted
=======================================================

Cron Job 排程
sudo crontab -e
## Gitlab Backup
# Launch Gitlab backup service
0 2 * * * /opt/gitlab/bin/gitlab-rake gitlab:backup:create
# Copy Gitlab backup file to remote server
0 3 * * * find /var/opt/gitlab/backups/ -name "*gitlab_backup.tar" -mtime -1 -exec /bin/cp -a {} /mnt/nas/GitlabBackupFolder \;
# Retain backup data on local folder in 3 days
0 4 * * * find /var/opt/gitlab/backups/ -name "*gitlab_backup.tar" -mtime +1 -exec rm -rf {} \;
# Retain backup data on local folder in 7 days
0 5 * * * find /mnt/nas/GitlabBackupFolder/ -name "*gitlab_backup.tar" -mtime +7 -exec rm -rf {} \;
成功
=======================================================
find /var/opt/gitlab/backups/ -name "*gitlab_backup.tar" -mtime +1
find /mnt/nas/GitlabBackupFolder/ -name "*gitlab_backup.tar" -mtime +7 -exec rm -rf {} \;


要還原時主要步驟:
先安裝與之前備份時相同版本的 Gitlab
停止 gitlab 的服務
將要還原的備份檔放到 /var/opt/gitlab/backups/ 位置
下指令指定要還原的 TIME_STAMP 備份檔
啟動 gitlab, Create satellites, Check gitlab ... 完成

https://poychang.github.io/gitlab-backup/
Gitlab 備份筆記

http://mycodetub.logdown.com/posts/260395-gitlab-backup-restore-settings-notes
Gitlab 備份/還原設定筆記

Gitlab備份與恢復、遷移與升級
https://www.itread01.com/content/1527863887.html


mkdir -p /mnt/nas/GitlabBackupFolder2
mount -t nfs 192.168.88.16:/volume1/GitlabBackup2 /mnt/nas/GitlabBackupFolder2
mount:  can't find in /etc/fstab.

2019年4月9日 星期二

Power Shell Command Change Domain Account Password


$tgtDomain = "tw.XXXnet.org"
$tgtUserName = "user_account"


$oldPassword = ConvertTo-SecureString -AsPlainText "abc123" -Force
$newPassword = ConvertTo-SecureString -AsPlainText "123abc" -Force

Set-ADAccountPassword -Server $tgtDomain -Identity $tgtUserName -OldPassword  $oldPassword -NewPassword $newPassword

2019年3月29日 星期五

Graylog Installation Record


[aws-pls-mongo1b] Shell record

$mkdir mongo

$sudo vi /etc/yum.repos.d/mongodb-org-3.6.repo file

[mongodb-org-3.6]
name=MongoDB Repository
baseurl=https://repo.mongodb.org/yum/amazon/2013.03/mongodb-org/3.6/x86_64/
gpgcheck=1
enabled=1
gpgkey=https://www.mongodb.org/static/pgp/server-3.6.asc

$sudo yum install -y mongodb-org

<ulimit settings for mongo>
$ sudo su
ulimit -f unlimited
ulimit -t unlimited
ulimit -v unlimited
ulimit -l unlimited
ulimit -n 64000
ulimit -m unlimited
<Verify>
ulimit -u 64000

reboot now

ulimit -a

$sudo service mongod status
$sudo service mongod start
$sudo service mongod status

$sudo chkconfig mongod on

$sudo vi  /etc/mongod.conf
# network interfaces
net:
  port: 27017
  bindIp: 0.0.0.0  # Listen to local interface only, comment to listen on all interfaces.

$sudo service mongod stop
$sudo service mongod start
$sudo service mongod status

# Verification and Passed
$ mongo --host 10.104.187.162:27017

mongo --host LB-PLS-BETA-MONGO-INT-77e51851111d7088.elb.us-west-2.amazonaws.com:27017

================================================

[aws-pls-elastic1b] Shell record


$ sudo yum install -y java
$ sudo rpm --import https://artifacts.elastic.co/GPG-KEY-elasticsearch
$ wget https://artifacts.elastic.co/downloads/elasticsearch/elasticsearch-6.5.4.rpm
$ sudo rpm --install elasticsearch-6.5.4.rpm
$ sudo systemctl start elasticsearch.service
$ sudo systemctl status elasticsearch.service

$ sudo vi /etc/elasticsearch/elasticsearch.yml
network.host: 0.0.0.0
http.port: 9200

$ sudo vi /etc/elasticsearch/jvm.options
-Xms4g
-Xmx4g

$ sudo systemctl restart elasticsearch.service
$ sudo systemctl status elasticsearch.service

# Verification and Passed
$ sudo curl "http://127.0.0.1:9200/_cat/nodes"
$ sudo curl "http://localhost:9200/_cat/nodes"
$ sudo curl "http://10.104.187.148:9200/_cat/nodes"
$ sudo curl -XGET 'http://localhost:9200/_cluster/health?pretty=true’
$ sudo curl -XGET 'http://127.0.0.1:9200/_cluster/health?pretty=true’
$ sudo curl -XGET "http://10.104.187.148:9200/_cluster/health?pretty=true"

[ec2-user@ip-10-104-187-162 ~]$ sudo curl "http://10.104.187.148:9200/_cat/nodes"
10.104.187.148 4 66 0 0.10 0.12 0.05 mdi * 4wlbKCJ

[ec2-user@ip-10-104-187-145 ~]$ sudo curl "http://10.104.187.148:9200/_cat/nodes"
10.104.187.148 3 67 1 0.02 0.05 0.01 mdi * 4wlbKCJ

[ec2-user@ip-10-104-187-145 ~]$ sudo curl "http://LB-PLS-BETA-ES-INT-78477d32e333724d.elb.us-west-2.amazonaws.com:9200/_cat/nodes"
10.104.187.148 3 67 1 0.02 0.05 0.01 mdi * 4wlbKCJ


[ec2-user@ip-10-104-187-145 ~]$ sudo curl "http://LB-PLS-BETA-ES-INT-78477d32e333724d.elb.us-west-2.amazonaws.com:9200/_cat/nodes"
10.104.187.148 5 67 0 0.00 0.00 0.00 mdi * 4wlbKCJ

sudo curl -XGET "http://LB-PLS-BETA-ES-INT-78477d32e333724d.elb.us-west-2.amazonaws.com:9200/_cluster/health?pretty=true"

================================================
<Passed>
telnet 10.104.187.148 9200
telnet 10.104.187.162 27017

<Passed>
LB-PLS-BETA-ES-INT-78477d32e333724d.elb.us-west-2.amazonaws.com
LB-PLS-BETA-MONGO-INT-77e51851111d7088.elb.us-west-2.amazonaws.com

telnet LB-PLS-BETA-ES-INT-78477d32e333724d.elb.us-west-2.amazonaws.com 9200
telnet LB-PLS-BETA-MONGO-INT-77e51851111d7088.elb.us-west-2.amazonaws.com 27017
sudo curl -XGET "http://LB-PLS-BETA-ES-INT-78477d32e333724d.elb.us-west-2.amazonaws.com:9200/_cluster/health?pretty=true"

[aws-pls-graylog1b] Shell record

$ sudo yum update
$ sudo yum install -y java
$ wget https://packages.graylog2.org/releases/graylog/graylog-2.5.1.tgz
             https://packages.graylog2.org/releases/graylog/graylog-2.5.1.tgz
             https://packages.graylog2.org/repo/packages/graylog-2.5-repository_latest.rpm
            https://packages.graylog2.org/repo/packages/graylog-2.5-repository_latest.rpm

$ tar xvfz graylog-2.5.1.tgz

$ sudo mkdir /etc/graylog
$ sudo mkdir /etc/graylog/server/

$ sudo cp ~/graylog-2.5.1/graylog.conf.example /etc/graylog/server/server.conf
$ sudo vi /etc/graylog/server/server.conf

<1>*
password_secret = sKzW2vDDkqOQTrKC
root_password_sha2 = 8c6976e5b5410415bde908bd4dee15dfb167a9c873fc4bb8a81f6f2ab448a918
elasticsearch_shards = 1
elasticsearch_hosts = http://LB-PLS-BETA-ES-INT-78477d32e333724d.elb.us-west-2.amazonaws.com:9200
mongodb_uri = mongodb://LB-PLS-BETA-MONGO-INT-77e51851111d7088.elb.us-west-2.amazonaws.com/graylog
rest_listen_uri = http://10.104.187.145:9000/api/
web_listen_uri = http://10.104.187.145:9000/
=>
rest_listen_uri = http://0.0.0.0:9000/api/
web_listen_uri = http://0.0.0.0:9000/

telnet 10.104.187.148 9200
telnet 10.104.187.162 27017
<2>
password_secret = sKzW2vDDkqOQTrKC
root_password_sha2 = 8c6976e5b5410415bde908bd4dee15dfb167a9c873fc4bb8a81f6f2ab448a918
elasticsearch_shards = 4
elasticsearch_hosts = http://10.104.187.148:9200
mongodb_uri = mongodb://10.104.187.162/graylog
rest_listen_uri = http://10.104.187.145:9000/api/

===================================================================
Configure at least the following variables in /etc/graylog/server/server.conf:

***
# List of Elasticsearch hosts Graylog should connect to.
# Need to be specified as a comma-separated list of valid URIs for the http ports of your elasticsearch nodes.
# If one or more of your elasticsearch hosts require authentication, include the credentials in each node URI that
# requires authentication.
#
# Default: http://127.0.0.1:9200
#elasticsearch_hosts = http://node1:9200,http://user:password@node2:19200


# MongoDB connection string
# See https://docs.mongodb.com/manual/reference/connection-string/ for details
<add>
mongodb_uri = mongodb://LB-PLS-BETA-MONGO-INT-77e51851111d7088.elb.us-west-2.amazonaws.com/graylog

# Authenticate against the MongoDB server
#mongodb_uri = mongodb://grayloguser:secret@localhost:27017/graylog

# Use a replica set instead of a single host
#mongodb_uri = mongodb://grayloguser:secret@localhost:27017,localhost:27018,localhost:27019/graylog
***

root_password_sha2 = 8c6976e5b5410415bde908bd4dee15dfb167a9c873fc4bb8a81f6f2ab448a918
elasticsearch_shards = 1
elasticsearch_hosts = http://LB-PLS-BETA-ES-INT-78477d32e333724d.elb.us-west-2.amazonaws.com:9200
mongodb_uri = mongodb://LB-PLS-BETA-MONGO-INT-77e51851111d7088.elb.us-west-2.amazonaws.com/graylog

#New ES
elasticsearch_hosts = https://vpc-pls-log-nonprod-jql2okbojnqn5npwbkbo5qjsgy.us-west-2.es.amazonaws.com


[ec2-user@ip-10-104-187-145 ~]$ echo -n "Enter Password: " && head -1 </dev/stdin | tr -d '\n' | sha256sum | cut -d" " -f1
Enter Password: admin
8c6976e5b5410415bde908bd4dee15dfb167a9c873fc4bb8a81f6f2ab448a918
===================================================================

Starting the server

$ sudo ./bin/graylogctl start
Starting graylog-server ...

$ sudo ./bin/graylogctl status
graylog-server running with PID 4175

$ sudo ./bin/graylogctl stop
Stopping graylog-server (4175) ...
Waiting for graylog-server to halt.
graylog-server stopped


$ tail ./log/graylog-server.log

Verification
http://10.104.187.145:9000
http://lb-pls-beta-graylog-int-51246890d683260e.elb.us-west-2.amazonaws.com:9000/gettingstarted

echo `date` | nc 10.104.187.145 12201
echo `date` | nc graylog-test.bapls.net 12201

http://graylog-test.bapls.net:9000

graylog-test.bapls.net


===========================================================
Sending in log data
http://docs.graylog.org/en/2.5/pages/sending_data.html

**Sending GELF messages via HTTP using curl
curl -XPOST http://10.104.187.145:12202/gelf -p0 -d '{"short_message":"Hello there IP0124", "host":"tw-pls-ta-dock", "facility":"test", "_foo":"bar"}'

curl -XPOST http://graylog-test.bapls.net:12202/gelf -p0 -d '{"short_message":"Hello there FQDN0124", "host":"tw-pls-ta-dock", "facility":"test", "_foo":"bar"}'

curl -XPOST http://LB-PLS-BETA-GRAYLOG-INT-51246890d683260e.elb.us-west-2.amazonaws.com:12202/gelf -p0 -d '{"short_message":"Hello there FQDN0124", "host":"tw-pls-ta-dock", "facility":"test", "_foo":"bar"}'

**Sending GELF messages via TCP using netcat
echo -n -e '{ "version": "1.1", "host": "tw-pls-ta-dock2", "short_message": "A short message by IP0124", "level": 5, "_some_info": "foo" }'"\0" | nc -w0 10.104.187.145 12201

echo -n -e '{ "version": "1.1", "host": "tw-pls-ta-dock2", "short_message": "A short message by FQDN0124", "level": 5, "_some_info": "foo" }'"\0" | nc -w0 graylog-test.bapls.net 12201

echo -n -e '{ "version": "1.1", "host": "tw-pls-ta-dock2", "short_message": "A short message by FQDN0124", "level": 5, "_some_info": "foo" }'"\0" | nc -w0 LB-PLS-BETA-GRAYLOG-INT-51246890d683260e.elb.us-west-2.amazonaws.com 12201


FQDN seems not works stable??

Testing Telnet 12201 port

max@tw-pls-ta-dock2:~$ telnet 10.104.187.145 12201
Trying 10.104.187.145...
Connected to 10.104.187.145.
Escape character is '^]'.

max@tw-pls-ta-dock2:~$ telnet graylog-test.bapls.net 12201
Trying 10.104.187.171...
Connected to lb-pls-beta-graylog-int-51246890d683260e.elb.us-west-2.amazonaws.com.
Escape character is '^]'.


Test curl http post
max@tw-pls-ta-dock2:~$ curl -XPOST http://10.104.187.145:12202/gelf -p0 -d '{"short_message":"Hello there IP1", "host":"example.org", "facility":"test", "_foo":"bar"}'
max@tw-pls-ta-dock2:~$ curl -XPOST http://graylog-test.bapls.net:12202/gelf -p0 -d '{"short_message":"Hello there FQDN1", "host":"example.org", "facility":"test", "_foo":"bar"}'


curl -XPOST http://graylog-test.bapls.net:12202/gelf -p0 -d '{"short_message":"Hello there FQDN1", "host":"example.org", "facility":"test", "_foo":"bar"}'

curl -X POST -u "ext_maxm:03e1ef098a609c3718cd3e10322a3acf" -H "Jenkins-Crumb:a32e3694b05057ca7942ae3d8d692693" http://tw-pls-jenk1.client.tw.trendnet.org:8080/view/Operation/view/2_Stage/job/DRI_PVT_STG_aws-pls-dris1s/buildWithParameters?token=thisismysecret&cause=trigger+by+shavlik+POC


Invoke-RestMethod -Uri http://graylog-test.bapls.net:12202/gelf -Method POST '{"short_message":"Hello there FQDN1", "host":"example.org", "facility":"test", "_foo":"bar"}'

Invoke-RestMethod -Uri http://10.104.187.145:12202/gelf -Method GET

$Url = "http://graylog-test.bapls.net:9000"
Invoke-RestMethod -Uri $url -Method Get


Test curl http
curl http://10.104.187.145:12202
<No Message Retured>
curl http://graylog-test.bapls.net:9000
<Some Retured>

==========================================

curl -o certificaterequest.csv --user certreport:Cert#Report9  'http://siteaddress/Reports/CertificateReport?starttime=2014-02-01T00:00:00&endtime=2014-05-01T00:00:00'


$cred = Get-Credential #will prompt you to enter userame and password
$csv="d:\output.csv"
$url="url"
Invoke-RestMethod -Uri $url -OutFile $csv -Credential $cred

curl -XPOST http://10.104.187.145:12202/gelf -p0 -d '{"short_message":"Hello there IP1", "host":"example.org", "facility":"test", "_foo":"bar"}'
echo -n -e '{ "version": "1.1", "host": "example.orgIP", "short_message": "A short message", "level": 5, "_some_info": "foo" }'"\0" | nc -w0 10.104.187.145 12201

$Url = "http://10.104.187.145:9000"
Invoke-RestMethod -Uri $url -Method Get

$Url = "http://10.104.187.145:12202"
$body= "Test"
Invoke-RestMethod -Uri $url -Method Post -Body $body -ContentType 'application/json' -Headers $hdrs


2019年3月13日 星期三

git commands

git commands

clone
branch
checkout branch##git to switch branch
add .
commit -m "####"
push

git push --set-upstream origin max
remote: Repository not found.
fatal: repository 'https://adc.github.trendmicro.com/BA-PLS/cd-gcs.git/' not found ??

$ git push
fatal: The current branch kk has no upstream branch.
To push the current branch and set the remote as upstream, use

    git push --set-upstream origin kk


ext_maxm@tw-maxmu MINGW64 ~/maxTestRepo (kk)
$ git push --set-upstream origin kk

Total 0 (delta 0), reused 0 (delta 0)
To https://adc.github.trendmicro.com/ext-maxm/maxTestRepo.git
 * [new branch]      kk -> kk
Branch 'kk' set up to track remote branch 'kk' from 'origin'.

ext_maxm@tw-maxmu MINGW64 ~/maxTestRepo (kk)
$

ext_maxm@tw-maxmu MINGW64 ~/maxTestRepo (kk)

==========================================
0308 all process

>git pull
>git branch ReadFromLast2FALSE
>git checkout ReadFromLast2FALSE
>git branch
* ReadFromLast2FALSE
  add_lmp
  master
  max0305
  max0307
  max2


>git add .
Edit code
>git add .

>git commit -m "ReadFromLast TRUE2FALSE"
[ReadFromLast2FALSE 1fb8ed5] ReadFromLast TRUE2FALSE
 Committer: Max Mu (EXT-TW) <max_mu@trendmicro.com>
Your name and email address were configured automatically based
on your username and hostname. Please check that they are accurate.
You can suppress this message by setting them explicitly. Run the
following command and follow the instructions in your editor to edit
your configuration file:

    git config --global --edit

After doing this, you may fix the identity used for this commit with:

    git commit --amend --reset-author

 4 files changed, 32 insertions(+), 20 deletions(-)

>git tag "1.2.12"
>git push
(or >git push --set-upstream origin add_lmp)
>git push --tags


2019年2月24日 星期日

delete all lines in vi vim

To delete all lines in vim, use this command:

:1,$d
This vim “delete all lines” command can be read like this:

The : character starts vim’s “last line mode.”
The 1 means, “starting at line 1”
The ,$ means, “until the end of the file”
The d means, “delete”

2019年2月20日 星期三

2019年1月29日 星期二

NXLog Installation


nxlog-ce-2.10.2150
  • NXLog Manager
  • NXLog Community Edition: Send data to most popular solutions. Need to ship data to ELK, Graylog, Loggly or some other SIEM? We got you covered!
  • NXLog Enterprise Edition


安裝的是 NXLog Community Edition,安裝好之後我們要去修改設定檔,
設定檔是 C:\Program Files (x86)\nxlog\conf\nxlog.conf,內容如下。

## This is a sample configuration file. See the nxlog reference manual about the
## configuration options. It should be installed locally and is also available
## online at http://nxlog.org/docs/

## Please set the ROOT to the folder your nxlog was installed into,
## otherwise it will not start.

#define ROOT C:\Program Files\nxlog
define ROOT C:\Program Files (x86)\nxlog

Moduledir %ROOT%\modules
CacheDir %ROOT%\data
Pidfile %ROOT%\data\nxlog.pid
SpoolDir %ROOT%\data
LogFile %ROOT%\data\nxlog.log

<Extension _syslog>
    Module      xm_syslog
</Extension>

<Input iislog> 我們先給 Input 標籤一個自定義的名字 iislog,我們要在標籤裡面去設定一組輸入的來源。
    Module      im_file Module:設定 為im_file
    File      "C:\\inetpub\\logs\\LogFiles\\W3SVC1\\u_ex*" File:設定 IIS Log 檔案的儲存位置
    SavePos      TRUE SavePos:設定為 TRUE,用來記住上次的讀檔位置。
</Input>

<Output logstash> 給 Output 檔籤一個自定義的名字 logstash,我們在標籤裡面去設定一組輸出的目的。
    Module      om_tcp Module:設定 為om_tcp
    Host        IP or hostname  Host:設定為 Logstash or GrayLog 伺服器的名稱或位址
    Port        12201 Port:設定為 Logstash 伺服器開啟監聽的埠號
</Output>

<Route 1>
    Path        iislog => logstash
</Route>

<Route>
Route 是告訴 NXLog 哪一個 Input 要對應到哪一個 Output,Input 及 Output 可以用逗號隔開設定多組,例如這樣:

<Route 1>多對多
    Path        iislog1,iislog2,… => logstash1,logstash2,…
</Route>

但是如果我們想指定 iislog1 只輸出給 logstash1、iislog2 則輸出給 logstash1 及 logstash2,這個時候就要設定第二組 Route 去另外指定,像這樣:

<Route 1>一對一
    Path        iislog1 => logstash1
</Route>

<Route 2>一對多
    Path        iislog2 => logstash1,logstash2
</Route>

Configuration file:
C:\Program Files (x86)\nxlog\conf\nxlog.conf

Log file
C:\Program Files (x86)\nxlog\data\nxlog.log

Refer [料理佳餚] ELK 搭檔 NXLog 收集 IIS Log


2018年9月16日 星期日

Windows Battery report Command

powercfg /batteryreport /output "C:\battery_report.html"
開 command line 貼上這行指令,就會輸出到 C:\battery_report.html


2018年7月12日 星期四

dig host nslookup command in Linux

dig:
dig @NameServer 網域名稱 Type

host:
host -t Type 網域名稱 NameServer

nslookup:
nslookup -type=Type 網域名稱 NameServer

其中 Type 的參數有


  1. any
  2. a: 查 IP Address
  3. mx: 查郵件伺服器
  4. ns: 查名稱伺服器
  5. cname: 查別名
  6. ptr: 由 IP Address 反查網域名稱
  7. hinfo: 查伺服器的系統資訊

$ dig @ns1.google.com www.google.com # 指定 NS1 的 dns server
$ dig google.com @8.8.4.4 # 指定 dns server (結果省略, 請自行測試)
$ dig +trace google.com # 追蹤看經過哪些節點 (結果省略, 請自行測試)
$ dig +trace google.com @8.8.8.8 # 指定 dns server + 追蹤路徑經過 (結果省略, 請自行測試)

CentOS 6 without dig command by default

#yum install bind-utils

:::

  Installing : 32:bind-libs-9.8.2-0.68.rc1.el6.x86_64                       1/2
  Installing : 32:bind-utils-9.8.2-0.68.rc1.el6.x86_64                      2/2
  Verifying  : 32:bind-libs-9.8.2-0.68.rc1.el6.x86_64                       1/2
  Verifying  : 32:bind-utils-9.8.2-0.68.rc1.el6.x86_64                      2/2

#host www.pchome.com.tw
www.pchome.com.tw has address 220.130.119.180

# dig www.pchome.com.tw

; <<>> DiG 9.8.2rc1-RedHat-9.8.2-0.68.rc1.el6 <<>> www.pchome.com.tw
;; global options: +cmd
;; Got answer:
;; ->>HEADER<<- opcode: QUERY, status: NOERROR, id: 10971
;; flags: qr rd ra; QUERY: 1, ANSWER: 1, AUTHORITY: 0, ADDITIONAL: 0

;; QUESTION SECTION:
;www.pchome.com.tw.             IN      A

;; ANSWER SECTION:
www.pchome.com.tw.      68      IN      A       220.130.119.180

;; Query time: 0 msec
;; SERVER: 10.1.107.40#53(10.1.107.40)
;; WHEN: Thu Jul  5 12:37:33 2018
;; MSG SIZE  rcvd: 51

# nslookup www.pchome.com.tw
Server:         10.1.107.40
Address:        10.1.107.40#53

Name:   www.pchome.com.tw
Address: 220.130.119.180


2018年7月4日 星期三

電子書: Puppet 從入門就放棄


Puppet 是一個基於實現 infrastructure as a code 的組態管理工具,與其相同性質的有 Ansible、SaltStack、Chef 等工具,Puppet 的特性是幾乎涵蓋所有的 OS System,並且適合在大量佈署的環境下使用。

為什麼會說 從入門就放棄 !? 我是從一個 System manager 的角度去看 Puppet,遇到蠻大多數的 System manager 都是因為不想要 coding 所以才選擇走 System manager 這個職位。

但是隨著時代改變,軟體吃掉全世界的這個議題已經越來越明顯,自動化已經是一個不可或缺的項目,Puppet 是一個強大的組態設定工具,因為支援許多判斷式所以導致會很像在 coding,但換來的是可以非常彈性的管理你的 Configure。

藉由本書希望可以將 Puppet 的門檻降低,走向美好的自動化世界

Linux DNS 解析問題


用戶端重試
DNS 主要是 UDP 通訊協定。 因為 UDP 通訊協定並不保證訊息傳遞,所以 DNS 通訊協定本身會處理重試邏輯。 每個 DNS 用戶端 (作業系統) 可以展現不同的重試邏輯,根據建立者喜好設定而定:
Windows 作業系統會在 1 秒後重試,然後再依序隔 2、4、4 秒後重試。
預設 Linux 安裝程式會在 5 秒之後重試。 您應該將此變更為以 1 秒的間隔重試 5 次。
檢查 Linux 虛擬機器上目前的設定 'cat /etc/resolv.conf',並查看 'options' 行,例如:


options timeout:1 attempts:5

/etc/sysconfig/network

RES_OPTIONS="rotate timeout:1 attempts:1"

resolv.conf 檔案會自動產生且不可編輯。 新增 [選項] 行的特定步驟會因發行版本而有所不同:


為了達到最佳效能,當您在 Azure DNS 伺服器中使用虛擬機器時,請停用 IPv6,並將執行個體層級公用 IP 指派給每部 DNS 伺服器虛擬機器。


Azure 中 Linux 虛擬機器的 DNS 名稱解析選項

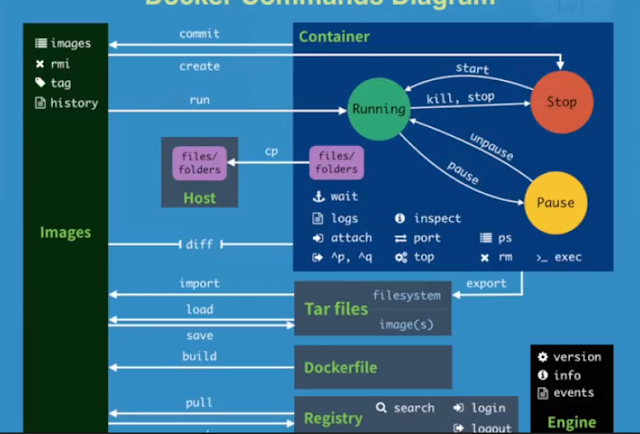
Docker Command

#1 pull images $docker pull chusiang/takaojs1607 #2 list images $docker images #3.1 run docker $docker run -it ### bash #3.2 run do...