2018年7月12日 星期四

dig host nslookup command in Linux

dig:
dig @NameServer 網域名稱 Type

host:
host -t Type 網域名稱 NameServer

nslookup:
nslookup -type=Type 網域名稱 NameServer

其中 Type 的參數有


  1. any
  2. a: 查 IP Address
  3. mx: 查郵件伺服器
  4. ns: 查名稱伺服器
  5. cname: 查別名
  6. ptr: 由 IP Address 反查網域名稱
  7. hinfo: 查伺服器的系統資訊

$ dig @ns1.google.com www.google.com # 指定 NS1 的 dns server
$ dig google.com @8.8.4.4 # 指定 dns server (結果省略, 請自行測試)
$ dig +trace google.com # 追蹤看經過哪些節點 (結果省略, 請自行測試)
$ dig +trace google.com @8.8.8.8 # 指定 dns server + 追蹤路徑經過 (結果省略, 請自行測試)

CentOS 6 without dig command by default

#yum install bind-utils

:::

  Installing : 32:bind-libs-9.8.2-0.68.rc1.el6.x86_64                       1/2
  Installing : 32:bind-utils-9.8.2-0.68.rc1.el6.x86_64                      2/2
  Verifying  : 32:bind-libs-9.8.2-0.68.rc1.el6.x86_64                       1/2
  Verifying  : 32:bind-utils-9.8.2-0.68.rc1.el6.x86_64                      2/2

#host www.pchome.com.tw
www.pchome.com.tw has address 220.130.119.180

# dig www.pchome.com.tw

; <<>> DiG 9.8.2rc1-RedHat-9.8.2-0.68.rc1.el6 <<>> www.pchome.com.tw
;; global options: +cmd
;; Got answer:
;; ->>HEADER<<- opcode: QUERY, status: NOERROR, id: 10971
;; flags: qr rd ra; QUERY: 1, ANSWER: 1, AUTHORITY: 0, ADDITIONAL: 0

;; QUESTION SECTION:
;www.pchome.com.tw.             IN      A

;; ANSWER SECTION:
www.pchome.com.tw.      68      IN      A       220.130.119.180

;; Query time: 0 msec
;; SERVER: 10.1.107.40#53(10.1.107.40)
;; WHEN: Thu Jul  5 12:37:33 2018
;; MSG SIZE  rcvd: 51

# nslookup www.pchome.com.tw
Server:         10.1.107.40
Address:        10.1.107.40#53

Name:   www.pchome.com.tw
Address: 220.130.119.180


2018年7月4日 星期三

電子書: Puppet 從入門就放棄


Puppet 是一個基於實現 infrastructure as a code 的組態管理工具,與其相同性質的有 Ansible、SaltStack、Chef 等工具,Puppet 的特性是幾乎涵蓋所有的 OS System,並且適合在大量佈署的環境下使用。

為什麼會說 從入門就放棄 !? 我是從一個 System manager 的角度去看 Puppet,遇到蠻大多數的 System manager 都是因為不想要 coding 所以才選擇走 System manager 這個職位。

但是隨著時代改變,軟體吃掉全世界的這個議題已經越來越明顯,自動化已經是一個不可或缺的項目,Puppet 是一個強大的組態設定工具,因為支援許多判斷式所以導致會很像在 coding,但換來的是可以非常彈性的管理你的 Configure。

藉由本書希望可以將 Puppet 的門檻降低,走向美好的自動化世界

Linux DNS 解析問題


用戶端重試
DNS 主要是 UDP 通訊協定。 因為 UDP 通訊協定並不保證訊息傳遞,所以 DNS 通訊協定本身會處理重試邏輯。 每個 DNS 用戶端 (作業系統) 可以展現不同的重試邏輯,根據建立者喜好設定而定:
Windows 作業系統會在 1 秒後重試,然後再依序隔 2、4、4 秒後重試。
預設 Linux 安裝程式會在 5 秒之後重試。 您應該將此變更為以 1 秒的間隔重試 5 次。
檢查 Linux 虛擬機器上目前的設定 'cat /etc/resolv.conf',並查看 'options' 行,例如:


options timeout:1 attempts:5

/etc/sysconfig/network

RES_OPTIONS="rotate timeout:1 attempts:1"

resolv.conf 檔案會自動產生且不可編輯。 新增 [選項] 行的特定步驟會因發行版本而有所不同:


為了達到最佳效能,當您在 Azure DNS 伺服器中使用虛擬機器時,請停用 IPv6,並將執行個體層級公用 IP 指派給每部 DNS 伺服器虛擬機器。


Azure 中 Linux 虛擬機器的 DNS 名稱解析選項

2018年4月26日 星期四

SQL 2014 Server HA failover solution without shared storage installation process

1. Base OS
2. Check MBR disk type D: disk
3. Add .NET Framework 3.5 and Failover features
4. Install SQS 2014, SP2, Balance Data Distributor
5. Enable Cluster Service
6. Check SQL/Cluster service works
7. Enable Always-on and 
8. Create new sql listener by creat Availability Group wizard (Bad)
9. Import and configure replica DB


No disk in it since we do not have SAN Share Storage


Final

2018年4月17日 星期二

CentOS 7 Installation, SSH Enablement, Proxy Setting


1. OS installation


2. Proxy Setting

在一般公司的環境下Client端都需要設定Proxy才可以對外連線
假設Proxy的IP:192.168.1.10 , port:8080
編輯 .bash_profile (root目錄下) ,新增以下(紅字):

http_proxy=192.168.1.10:8080
ftp_proxy=192.168.1.10:8080
export http_proxy
export ftp_proxy

執行
[root@Server ~]# source .bash_profile

看看是否設定成功
[root@Server ~]# echo $http_proxy
192.168.1.10:8080

  • 針對所有使用者
如果要讓這台主機的所有 http / https 都走 proxy 就設定在 /etc/profile

2.1 For Yum proxy setting
/etc/yum.conf
add line proxy=http://192.160.1.1:8080

$ vim /etc/apt/apt.conf
Acquire::http::Proxy "http://proxy.example.com";

2.2 Docker Hub Proxy setting [Refer]

mkdir /etc/systemd/system/docker.service.d
vim /etc/systemd/system/docker.service.d/http-proxy.conf

[Service]
Environment="HTTP_PROXY=http://10.1.107.222:8080"

systemctl daemon-reload
systemctl show --property Environment docker


設定永久變數
  • 僅在目前使用者
永久變數可以寫在登入後會讀取的 ~/.bash_profile , ~/.bashrc

  • 針對所有使用者
如果要讓這台主機的所有 http / https 都走 proxy 就設定在 /etc/profile

  • 僅 apt or yum 使用時才用 proxy


3. Yum install OpenSSH server
$ sudo yum install openssh openssh-server


4. Edit /etc/ssh/sshd_config

Port 22 -> xxx

PermitRootLogin no

Protocol 2


sudo systemctl restart sshd.service

sudo systemctl enable sshd.service

sudo systemctl status  sshd.service


5. Config Firewall

SELinux disable

Check Firewall already disabled
#getenforce

If Firewall not show disabled, please modify the file.
#vi /etc/sysconfig/selinux
SELINUX=disabled
(Need to reboot)

# firewall-cmd --permanent --add-port=200-300/tcp
success
# firewall-cmd --reload
successls


CentOS7 Firewall refer:
https://www.rootusers.com/how-to-open-a-port-in-centos-7-with-firewalld/
http://blog.xuite.net/tolarku/blog/363801991-CentOS+7+Firewalld+%E9%98%B2%E7%81%AB%E7%89%86%E8%AA%AA%E6%98%8E%E4%BB%8B%E7%B4%B9

6. Add new user

#Add user for DEV or QA

useradd John
passwd John

#chmod 660 /etc/sudoers
Add user into sudoer to get root permission
#vi /etc/sudoers
John ALL=(ALL)  ALL


2018年3月21日 星期三

Telnet testing port workable

Install telnet tool on Windows;


telnet www.example.net 80

NetBIOS Over TCP/IP
The Windows 2000 implementation of NetBIOS over TCP/IP is referred to as NetBT . NetBT uses the following TCP and UDP ports:

UDP port 137 (name services)

UDP port 138 (datagram services)

TCP port 139 (session services)

Execute Remote batch file

假設該電腦
虛擬IP 192.168.1.66
該資料夾為 D:\B_Folder
該檔案為 A.exe
步驟:
1.擁有該電腦的 Administrator 權限(單機最高權限)
帳號: administrator 密碼: pwd
2.寫批次檔內容如下(1.bat):
10.104.67.237
10.104.69.235


net use \\192.168.1.66\d$\B_Folder "pwd" /user:"admini"
\\192.168.1.66\d$\B_Folder\A.exe

Working:
net use \\hostname\D$\users\david "pwd" /user:"administrator"
\\hostname\D$\users\david\123.bat

Execute PowerShell Script

直接在 PowerShell 的環境中
打入 D:\Learning\PowerShell\Ch02\GetFileShares.ps1
或是
先 cd D:\Learning\PowerShell\Ch02\
再打入 .\GetFileShares.ps1 (即便是在現行作用目錄區中,也要用 .\ )

在啟動 PowerShell 環境時
PowerShell -Noexit -command "D:\Learning\PowerShell\Ch02\GetWmiAndQuery.ps1"
參數
-Noexit:為了保持 PowerShell 的執行結果,能保留下來。
-command:為了是在啟動 PowerShell 時,一併載入指定的批次檔案。


PowerShell Scripts 如何執行?

http://pertonchang.blogspot.tw/2009/05/powershell-scripts.html

Run as Administrator

Open Powershell first:
Type PowerShell to enter a PowerShell session.
Once in the session:
Type Start-Process PowerShell -Verb RunAs and press Enter.
That will open a new Powershell process as Administrator.
------- OR -------
To do it all with only one line from the command prompt, just type:
powershell -Command "Start-Process PowerShell -Verb RunAs"

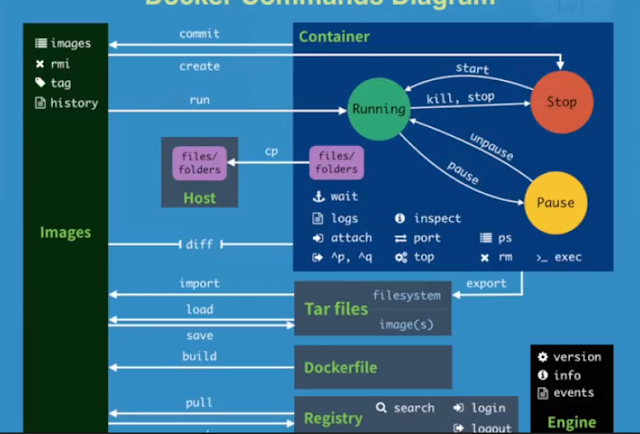
Docker Command

#1 pull images $docker pull chusiang/takaojs1607 #2 list images $docker images #3.1 run docker $docker run -it ### bash #3.2 run do...